


Updated at: 2022-12-09 03:49:50
The following server installation process is illustrated using x86_64 version as an example. The deployment of ARM version is almost the same (upload the ARM installation package instead).
Mind the following:
§ Information such as date, version and directory involved in commands and screenshots are for reference only. Please refer to the actual release package.
Please perform system checkout before installation. For more information, refer to Checking System.
§ Software package varies for different AnyBackup Family products. Please obtain correct software package before performing installation.
§ If both IPV4 and IPV6 addresses are used, they should be configured on the same NIC.
§ As security hardening has been performed for software package and limited permissions are configured, please do not change any permissions for the software package. After unpacking, do not delete, add or modify any files in the package without prior consent. Such action may result in installation failure or service start failure.
Step 1 Upload the software installation package to the server.
For appliance:
Security hardening has been performed for operating system, and SSH link is open only for the apollo user. If an apollo user upload the installation package directly to /backupsoft, the permission for the package will be changed. For this reason, an apollo user needs to switch to root user after log into the server, and then modify the configuration items in /etc/ssh/sshd_config file by running command:
vi /etc/ssh/sshd_config
PermitRootLogin no to PermitRootLogin yes
AllowUsers apollo to AllowUsers apollo root
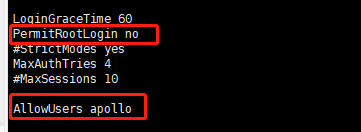

After saving, restart SSHD service by running systemctl restart sshd.
After restart, log into the server as a root user, and upload the installation package to /backupsoft using xftp or other remote tools. Then, modify the changed items in the configuration file to the original ones, if customers have security pursuit.
For software:
The operating system of software has been put in place by the customer. If only ordinary user is supported, please upload installation package as the steps specified for appliance. If the server can be logged into by a root user, just upload installation package as a root user. For uploading the package, a minimum of 40 GB free memory is required in the installation directory (/backupsoft is recommended).
Mind the following:
§ For ApolloOS, the non-system folder /backupsoft has been prepared. For CentOS and Redhat, you need to create a non-system folder, for example /backupsoft, by using mkdir backupsoft command. Then assign 755 permission to the newly-created folder by command chmod 755 backupsoft.
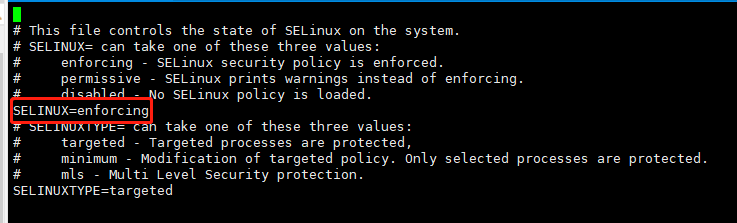
§ For appliance FX18000 using EulerOS developed by Huawei with SELinux enabled, server software has to be installed under /opt. In the opposite case, services cannot be started after the system is restarted and a message will be sent notifying that the process file lacks certain permissions. If you want to install the server software in another directory with enough space, disable SELinux by changing SELINUX=enforcing to SELINUX=disabled in /etc/selinux/config.
Step 2 Unpack the installation package (Use command tar -zxvf rather than tar -ozxvf because the latter will change package permissions).
tar -zxvf AnyBackupServer-Linux_el7_x64-7.0.13.0-2021xxxx-release-zh_CN-build number.tar.gz
Step 3 Check the unpacked installation package.
Run command ll to view package permissions:

If installation package is unpacked in a new environment, AnyBackup Server user and user group will be displayed as root: 2048, who has the permission 550. As 2048 is the UID for an ordinary user eab created during installation, 2048 will be changed to eab after installation is complete. (You are not allowed to modify permissions and user group. As security hardening has been performed for every directory and file, once permissions or related files are changed, the installation may fail.)
Step 4 Install the software.
cd /backupsoft/AnyBackupServer
Run installation command.
For deployment on one node with one IP address (IPV4 or IPV6), run following command.
./install.sh --product=product type --server-type=NONE --self-ip= xxx.xxx.xxx
For example,
./install.sh --product= --server-type= --self-ip=
For deployment on one node with multiple IP addresses, run command:
l IPV4: ./install.sh --product=product type --server-type=MASTER --self-ip= xxx.xxx.xxx(ipv4) --cluster-id=108 --cluster-vip= xxx.xxx.xxx(ipv4) --install-db=yes --db-id=109 --db-vip=xxx.xxx.xxx(ipv4) --ntp-server= xxx.xxx.xxx(same as cluster-vip) --ssl=no (optional)
For example, ./install.sh --product=< Enterprise > --server-type=MASTER --self-ip=192.168.10.58 --cluster-id=253 --cluster-vip=192.168.10.253 --install-db=yes --db-id=254 --db-vip=192.168.10.254 --ntp-server=192.168.10.253 --ssl=no
l IPV6: ./install.sh --product=product type --server-type=MASTER --self-ip= xxx.xxx.xxx(ipv6) --cluster-id=108 --cluster-vip= xxx.xxx.xxx(ipv6) --install-db=yes --db-id=109 --db-vip=xxx.xxx.xxx(ipv6) --ntp-server= xxx.xxx.xxx(same as cluster-vip)--ssl=no (optional)
For example, ./install.sh --product= Enterprise --server-type=MASTER --self-ip=fc99:3084::a03:541a --cluster-id=108 --cluster-vip=fc99:3084::a03:5421 --install-db=yes --db-id=109 --db-vip=fc99:3084::a03:5422 --ntp-server=fc99:3084::a03:5421 --ssl=no
l For deployment with both IPV4 and IPV6 addresses, run command:
./install.sh --product=product type --server-type=MASTER --self-ip= xxx.xxx.xxx(ipv4)--self-ip-ex=xxx.xxx.xxx(ipv6) --cluster-id=108 --cluster-vip= xxx.xxx.xxx(ipv4) --cluster-vip-ex=xxx.xxx.xxx(ipv6) --install-db=yes --db-id=109 --db-vip=xxx.xxx.xxx(ipv4)--ntp-server= xxx.xxx.xxx(same as cluster-vip)--ssl=no (optional)
For example,
./install.sh --product=Enterprise --server-type=MASTER --self-ip=10.3.84.23 --self-ip-ex=fc99:3084::a03:541a --cluster-id=108 --cluster-vip=10.3.84.253 --cluster-vip-ex=fc99:3084::a03:5421 --install-db=yes --db-id=109 --db-vip=10.3.84.254 --ntp-server=10.3.84.253 --ssl=no
For parameter description, see Important Parameters.
The installation commands are explained as shown in the figure.
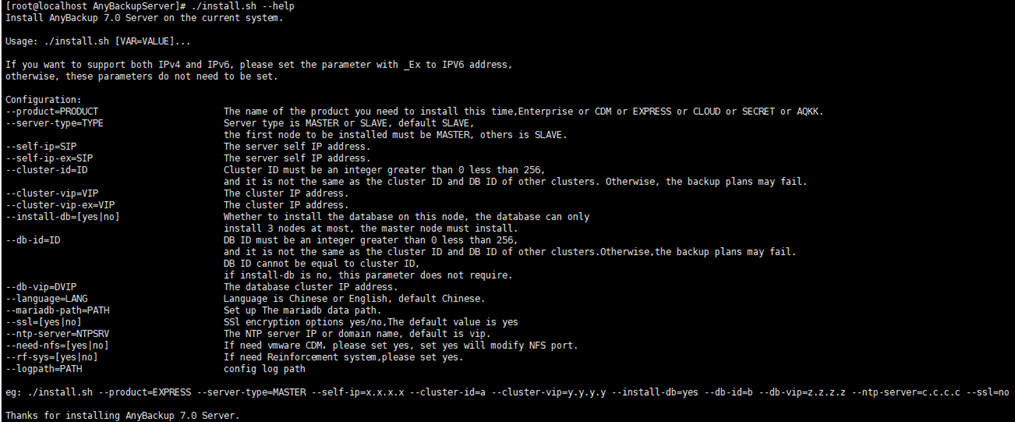
Installation Commands
The installation process is as shown in the figure.
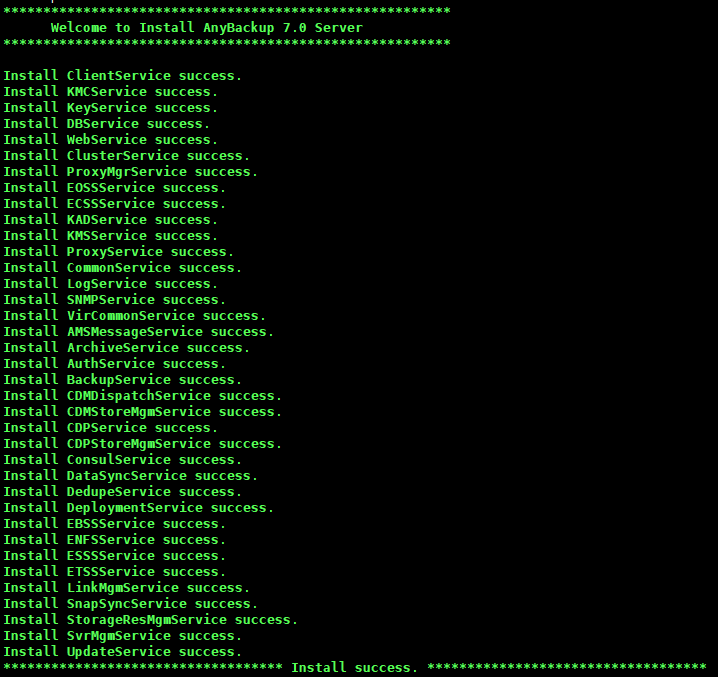
Installation Succeeds
If server installation fails after binding the NIC as Logical NIC, see “Public Management-Server Management” in AnyBackup Family 7.0.13.0 FAQs.
Important:
If AnyBackup EKVM has been installed, please run the command usermod -a -G libvirt eab after AnyBackup Family is installed. In the opposite case, the functionalities of takeover and exercise and VM management will not be available.
Mind the following:
§ Information such as date, version and directory involved in commands and screenshots are for reference only. Please refer to the actual release package.
Please perform system checkout before installation. For more information, refer to Checking System.
§ Software package varies for different AnyBackup Family products. Please obtain correct software package before performing installation.
§ If both IPV4 and IPV6 addresses are used, they should be configured on the same NIC.
§ As security hardening has been performed for software package and limited permissions are configured, please do not change any permissions for the software package. After unpacking, do not delete, add or modify any files in the package without prior consent. Such action may result in installation failure or service start failure.
Step 1 Upload the software installation package to the server.
For appliance:
Security hardening has been performed for operating system, and SSH link is open only for the apollo user. If an apollo user upload the installation package directly to /backupsoft, the permission for the package will be changed. For this reason, an apollo user needs to switch to root user after log into the server, and then modify the configuration items in /etc/ssh/sshd_config file by running command:
vi /etc/ssh/sshd_config
PermitRootLogin no to PermitRootLogin yes
AllowUsers apollo to AllowUsers apollo root
After saving, restart SSHD service by running systemctl restart sshd.
After restart, log into the server as a root user, and upload the installation package to /backupsoft using xftp or other remote tools. Then, modify the changed items in the configuration file to the original ones, if customers have security pursuit.
For software:
The operating system of software has been put in place by the customer. If only ordinary user is supported, please upload installation package as the steps specified for appliance. If the server can be logged into by a root user, just upload installation package as a root user. For uploading the package, a minimum of 40 GB free memory is required in the installation directory (/backupsoft is recommended).
Mind the following:
§ For ApolloOS, the non-system folder /backupsoft has been prepared. For CentOS and Redhat, you need to create a non-system folder, for example /backupsoft, by using mkdir backupsoft command. Then assign 755 permission to the newly-created folder by command chmod 755 backupsoft.
§ For appliance FX18000 using EulerOS developed by Huawei with SELinux enabled, server software has to be installed under /opt. In the opposite case, services cannot be started after the system is restarted and a message will be sent notifying that the process file lacks certain permissions. If you want to install the server software in another directory with enough space, disable SELinux by changing SELINUX=enforcing to SELINUX=disabled in /etc/selinux/config.
Step 2 Unpack the installation package (Use command tar -zxvf rather than tar -ozxvf because the latter will change package permissions).
tar -zxvf AnyBackupServer-Linux_el7_x64-7.0.13.0-2021xxxx-release-zh_CN-build number.tar.gz
Step 3 Check the unpacked installation package.
Run command ll to view package permissions:
If installation package is unpacked in a new environment, AnyBackup Server user and user group will be displayed as root: 2048, who has the permission 550. As 2048 is the UID for an ordinary user eab created during installation, 2048 will be changed to eab after installation is complete. (You are not allowed to modify permissions and user group. As security hardening has been performed for every directory and file, once permissions or related files are changed, the installation may fail.)
Step 4 Install the software.
| Deploying Mode | Description |
| Single Node | For a single-node environment, only one server is required. Extending is not allowed. VIP and ID are not required. |
| Cluster | A single-node or three-node cluster can be deployed. Parameters like VIP, DBIP and ID are required. |
cd /backupsoft/AnyBackupServer
Run installation command.
For deployment on one node with one IP address (IPV4 or IPV6), run following command.
./install.sh --product=product type --server-type=NONE --self-ip= xxx.xxx.xxx
For example,
./install.sh --product= --server-type= --self-ip=
For deployment on one node with multiple IP addresses, run command:
l IPV4: ./install.sh --product=product type --server-type=MASTER --self-ip= xxx.xxx.xxx(ipv4) --cluster-id=108 --cluster-vip= xxx.xxx.xxx(ipv4) --install-db=yes --db-id=109 --db-vip=xxx.xxx.xxx(ipv4) --ntp-server= xxx.xxx.xxx(same as cluster-vip) --ssl=no (optional)
For example, ./install.sh --product=< Enterprise > --server-type=MASTER --self-ip=192.168.10.58 --cluster-id=253 --cluster-vip=192.168.10.253 --install-db=yes --db-id=254 --db-vip=192.168.10.254 --ntp-server=192.168.10.253 --ssl=no
l IPV6: ./install.sh --product=product type --server-type=MASTER --self-ip= xxx.xxx.xxx(ipv6) --cluster-id=108 --cluster-vip= xxx.xxx.xxx(ipv6) --install-db=yes --db-id=109 --db-vip=xxx.xxx.xxx(ipv6) --ntp-server= xxx.xxx.xxx(same as cluster-vip)--ssl=no (optional)
For example, ./install.sh --product= Enterprise --server-type=MASTER --self-ip=fc99:3084::a03:541a --cluster-id=108 --cluster-vip=fc99:3084::a03:5421 --install-db=yes --db-id=109 --db-vip=fc99:3084::a03:5422 --ntp-server=fc99:3084::a03:5421 --ssl=no
l For deployment with both IPV4 and IPV6 addresses, run command:
./install.sh --product=product type --server-type=MASTER --self-ip= xxx.xxx.xxx(ipv4)--self-ip-ex=xxx.xxx.xxx(ipv6) --cluster-id=108 --cluster-vip= xxx.xxx.xxx(ipv4) --cluster-vip-ex=xxx.xxx.xxx(ipv6) --install-db=yes --db-id=109 --db-vip=xxx.xxx.xxx(ipv4)--ntp-server= xxx.xxx.xxx(same as cluster-vip)--ssl=no (optional)
For example,
./install.sh --product=Enterprise --server-type=MASTER --self-ip=10.3.84.23 --self-ip-ex=fc99:3084::a03:541a --cluster-id=108 --cluster-vip=10.3.84.253 --cluster-vip-ex=fc99:3084::a03:5421 --install-db=yes --db-id=109 --db-vip=10.3.84.254 --ntp-server=10.3.84.253 --ssl=no
For parameter description, see Important Parameters.
The installation commands are explained as shown in the figure.
Installation Commands
The installation process is as shown in the figure.
Installation Succeeds
If server installation fails after binding the NIC as Logical NIC, see “Public Management-Server Management” in AnyBackup Family 7.0.13.0 FAQs.
Important:
If AnyBackup EKVM has been installed, please run the command usermod -a -G libvirt eab after AnyBackup Family is installed. In the opposite case, the functionalities of takeover and exercise and VM management will not be available.
< Previous:
Next: >