Updated at: 2022-12-09 03:49:50
To install,
Step 1 Log in to the server and copy the client installation package to the specified location in root user.
Step 2 Unpack the package with tar -xvf package name. tar –xvf
AnyBackupClient-Solaris_5.11_sparc64-7.0.13.0-20190820-release-zh_CN-817.tar.gz
Step 3 Enter the unpacked directory AnyBackupClient/ClientService, and input the installation command ./install.sh
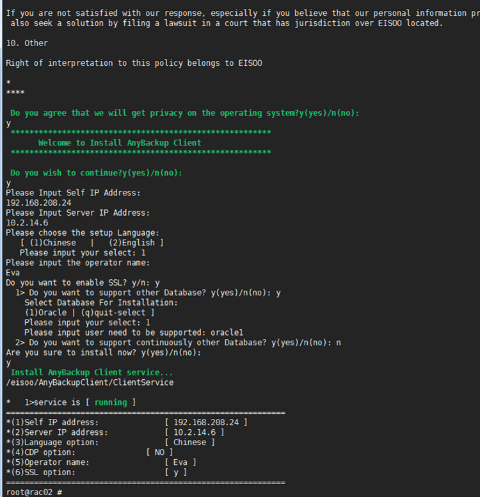
The installation steps after confirming the copyright information are shown in the following figure.

To install,
Step 1 Select y to confirm copyright information.
Step 2 Fill in your own IP address. For a server which has multiple NICs, data can be backed up through the designated NIC, and this IP address will be displayed in the backup server.
Step 3 Fill in the VIP address of the backup server.
Step 4 Enter 1 or 2 to select the language (Chinese or English).
Step 5 Add the operating system user in the backup server, and click Enter to continue.
Step 6 If SSL is enabled for backup server, it shall be enabled for client as well. Then click y. If not, you can input n.
Step 7 For whether to support other database types, input y.
Step 8 Select the database to be installed, select 1 here. Click Enter to output the installation user of the database.
Step 9 For whether to support other database types, if another database is installed in the client environment and data protection is required, enter y here, otherwise enter n.
Step 10 For whether to start client service installation, enter y if all selections are correct, and the software will be automatically installed. It not, enter n to exit and run the installation script again.
After installation completes, enter the backup server as a system administrator and the related IP can be viewed in Resources > Client > External Client. If the status is online, the installation succeeds.
Step 1 Log in to the server and copy the client installation package to the specified location in root user.
Step 2 Unpack the package with tar -xvf package name. tar –xvf
AnyBackupClient-Solaris_5.11_sparc64-7.0.13.0-20190820-release-zh_CN-817.tar.gz
Step 3 Enter the unpacked directory AnyBackupClient/ClientService, and input the installation command ./install.sh
The installation steps after confirming the copyright information are shown in the following figure.

To install,
Step 1 Select y to confirm copyright information.
Step 2 Fill in your own IP address. For a server which has multiple NICs, data can be backed up through the designated NIC, and this IP address will be displayed in the backup server.
Step 3 Fill in the VIP address of the backup server.
Step 4 Enter 1 or 2 to select the language (Chinese or English).
Step 5 Add the operating system user in the backup server, and click Enter to continue.
Step 6 If SSL is enabled for backup server, it shall be enabled for client as well. Then click y. If not, you can input n.
Step 7 For whether to support other database types, input y.
Step 8 Select the database to be installed, select 1 here. Click Enter to output the installation user of the database.
Step 9 For whether to support other database types, if another database is installed in the client environment and data protection is required, enter y here, otherwise enter n.
Step 10 For whether to start client service installation, enter y if all selections are correct, and the software will be automatically installed. It not, enter n to exit and run the installation script again.
After installation completes, enter the backup server as a system administrator and the related IP can be viewed in Resources > Client > External Client. If the status is online, the installation succeeds.
< Previous:
Next: >


