


Updated at: 2022-12-09 03:49:50
Step 1 Unpack software installation package, for example:
tar -zvxf AnyBackupClient-Redhat_5_x64-7.0.13.0-20190819-release-zh_CN-803.tar.gz
Step 2 Enter the software installation directory AnyBackupClient/ClientService, and input the installation command ./install.sh. The installation steps are shown below.
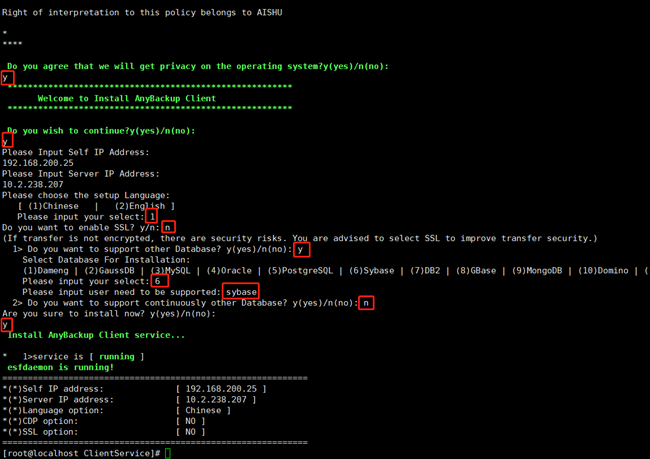
1. Input y to confirm copyright information.
2. Input y to continue the installation.
3. Fill in your own IP address. For a server which has multiple NICs, data can be backed up through the designated NIC, and this IP address will be displayed in the backup server.
4. Fill in the Cluster-VIP address of the backup server.
5. Enter 1 or 2 to select the language (Chinese or English).
6. operator name option can be set as null, click Enter directly. Note that the name of the operator that has been created on the backup server can also be filled in. The client will be automatically assigned to the operator after the client is successfully installed.
7. For whether to enable SSL, input n.
8. For whether to support other database types, input y, because Sybase database shall be supported.
9. Input 6 indicates selecting Sybase database, and input q indicates exiting. Input 6 here.
10. Input the username of the Sybase database. Input sybase here if the username is sybase.
11. For whether to support other database types, if the client does not require Sybase backup and recovery for multiple users, fill in n here. If the client is a multi-user Sybase environment and the database under each user needs backup and recovery, input y here. The remaining steps are the same as Step 9 and Step 10.
12. Input y to start installation.
13. After installation completes, log in to the console as a system administrator and the related IP can be viewed in Resources > Client > External Client. If the status is online, the installation succeeds.
tar -zvxf AnyBackupClient-Redhat_5_x64-7.0.13.0-20190819-release-zh_CN-803.tar.gz
Step 2 Enter the software installation directory AnyBackupClient/ClientService, and input the installation command ./install.sh. The installation steps are shown below.
1. Input y to confirm copyright information.
2. Input y to continue the installation.
3. Fill in your own IP address. For a server which has multiple NICs, data can be backed up through the designated NIC, and this IP address will be displayed in the backup server.
4. Fill in the Cluster-VIP address of the backup server.
5. Enter 1 or 2 to select the language (Chinese or English).
6. operator name option can be set as null, click Enter directly. Note that the name of the operator that has been created on the backup server can also be filled in. The client will be automatically assigned to the operator after the client is successfully installed.
7. For whether to enable SSL, input n.
8. For whether to support other database types, input y, because Sybase database shall be supported.
9. Input 6 indicates selecting Sybase database, and input q indicates exiting. Input 6 here.
10. Input the username of the Sybase database. Input sybase here if the username is sybase.
11. For whether to support other database types, if the client does not require Sybase backup and recovery for multiple users, fill in n here. If the client is a multi-user Sybase environment and the database under each user needs backup and recovery, input y here. The remaining steps are the same as Step 9 and Step 10.
12. Input y to start installation.
13. After installation completes, log in to the console as a system administrator and the related IP can be viewed in Resources > Client > External Client. If the status is online, the installation succeeds.
< Previous:
Next: >