


Updated at: 2022-12-09 03:49:50
To install,
Step 1 Log in to the server and copy the software installation package to the specified location in root user.
Step 2 Unpack the package with tar -xvf package name.
tar –xvf AnyBackupClient-AIX_5.3_power64-7.0.13.0-20190820-release-zh_CN-817.tar.gz
Step 3 Enter the unpacked directory AnyBackupClient/ClientService, and input the installation command ./install.sh
The installation steps after confirming the copyright information are shown in the following figure.
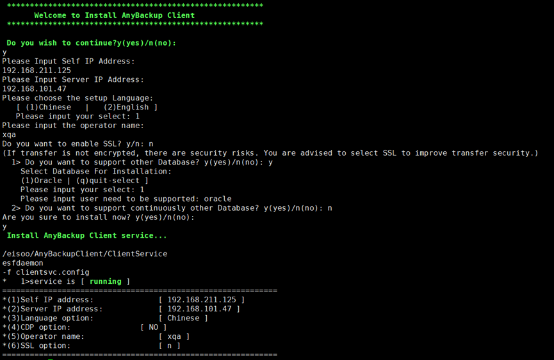
To install,
Step 1 Select y to confirm copyright information.
Step 2 Fill in your own IP address. For a server which has multiple NICs, data can be backed up through the designated NIC, and this IP address will be displayed in the backup server.
Step 3 Fill in the VIP address of the backup server.
Step 4 Enter 1 or 2 to select the language (Chinese or English).
Step 5 Add the operating system user in the backup server, and click Enter to continue.
Step 6 If SSL is enabled for backup server, it shall be enabled for client as well. Then input y. If not, input n.
Step 7 Input y for whether to support other database types.
Step 8 Select the database to be installed, select 1 here. Click Enter to output the installation user of the database.
Step 9 For whether to support other database types, if another database is installed in the client environment and data protection is required, enter y, otherwise enter n.
Step 10 For whether to start client service installation, enter y if all the selections are correct, and the software will be installed automatically. If not, enter n to exit and then run the installation script again.
After installation completes, enter the backup server as a system administrator and the related IP can be viewed in Resources > Client > External Client. If the status is online, the installation succeeds.
Step 1 Log in to the server and copy the software installation package to the specified location in root user.
Step 2 Unpack the package with tar -xvf package name.
tar –xvf AnyBackupClient-AIX_5.3_power64-7.0.13.0-20190820-release-zh_CN-817.tar.gz
Step 3 Enter the unpacked directory AnyBackupClient/ClientService, and input the installation command ./install.sh
The installation steps after confirming the copyright information are shown in the following figure.
To install,
Step 1 Select y to confirm copyright information.
Step 2 Fill in your own IP address. For a server which has multiple NICs, data can be backed up through the designated NIC, and this IP address will be displayed in the backup server.
Step 3 Fill in the VIP address of the backup server.
Step 4 Enter 1 or 2 to select the language (Chinese or English).
Step 5 Add the operating system user in the backup server, and click Enter to continue.
Step 6 If SSL is enabled for backup server, it shall be enabled for client as well. Then input y. If not, input n.
Step 7 Input y for whether to support other database types.
Step 8 Select the database to be installed, select 1 here. Click Enter to output the installation user of the database.
Step 9 For whether to support other database types, if another database is installed in the client environment and data protection is required, enter y, otherwise enter n.
Step 10 For whether to start client service installation, enter y if all the selections are correct, and the software will be installed automatically. If not, enter n to exit and then run the installation script again.
After installation completes, enter the backup server as a system administrator and the related IP can be viewed in Resources > Client > External Client. If the status is online, the installation succeeds.
< Previous:
Next: >