


Updated at: 2022-12-09 03:49:50
I Content Analysis and Retrieval
Note 1) It should be consistent that the memories of all installation nodes of the Content Analysis and Retrieval Service.
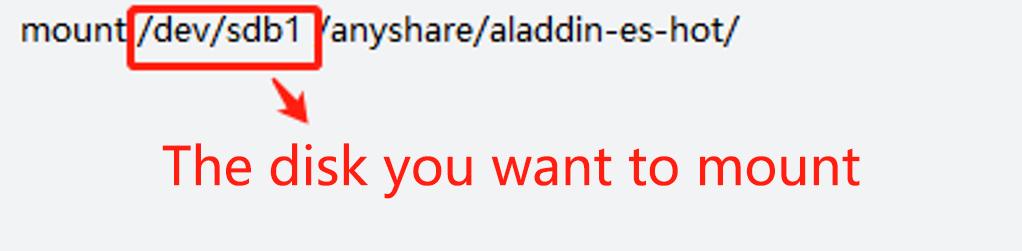
2) Mount the disk to the directory: / anyshare / Aladdin-es-hot (the disk is used to store index data and the disk space is not less than the data size);
3) Modify the configuration file: / etc / fstab to realize the automatic mount after startup;
4) Below are example names of the packages, which is only for reference.
Package of Content Analysis and Retrieval: Analysis_Index-Server-7.0.0-20200629-el7.x86_64-33.tar.gz
1.1 Download the package of the Content Analysis and Retrieval and store it in any directory of primary nodes;
1.2 Enter the directory of the master node: /sysvol/apphome/app/ThriftAPI/gen-py-tmp/Deploy;
Note: The following commands are executed in this directory.

1.3 Upload the Package;
Note: In uploading the installation package, the service must be renamed “content analysis retrieval”.

Eg:

1.4 Instal the Content Analysis and Retrieval Service;
Note: Microservices are installed on multiple nodes and nodes IP need be separated by commas.

Eg:

1.5 Run the command: python /sysvol/apphome/service_init/set_es_mapping.py 127.0.0.1 9300;
1.6 Deployment Verification
Run the command: kubectl get pod -o wide -n anyshare
If the pod status is running, it means a normal running status and a successful deployment

1.7 In installing the Content Analysis and Retrieval, the Metadata service is not connected by default. If you need Metadata service-related functions such as tags, summaries, catalog search, etc., run the command
when the installation is finished.

1.8 Uninstall the Content Analysis and Retrieval Service;

II Antivirus Service
Note: Below are example names of the packages only for reference.
Package of the Antivirus Service:This email address is being protected from spambots. You need JavaScript enabled to view it.
1.1 Download the package of the Antivirus Service and store it in any directory of primary nodes;
1.2 Enter the directory of the master node: /sysvol/apphome/app/ThriftAPI/gen-py-tmp/Deploy;
Note: The following commands are executed in this directory.

1.3 Upload the Package;
Note: In uploading the installation package, the name of the service can be given freely. For example, eantivirus.

Eg:

1.4. Instal the Antivirus Service;
Note: Microservices are installed on multiple nodes and nodes IP need be separated by commas.

Eg:

You need to manually upload the virus database to the specified directory: /sysvol/cache/antivirus/rising/ of the Antivirus Service. By default, there is no such directory, rising, which needs creating manually.
The download address of the virus database is: AnyShare://产品安装包和补丁库/AnyShare产品部/瑞星病毒库
Now run the command: kubectl get pod -o wide -n anyshare. If an abnormal pod status is found,

run the command: kubectl get pod pod_name -n anyshare to restart the Containerized Antivirus Service (the pod_name here is only for reference)

1.6 Deployment Verification
Run the command: kubectl get pod -o wide -n anyshare
If the pod status is running, it means a normal running status and a successful deployment

1.7. Uninstall the Antivirus Service

Eg:

III Metadata Service
1.1 Instal Mongodb;
1.1.1 Upload the four mongodb installation packages (rpm packages) to each directory: /tmp/mongodb where the mongodb node needs installing;
1.1.2 Enter the directory of the master node, /sysvol/apphome/app/ThriftAPI/gen-py-tmp/Deploy (The following commands are executed in this directory.);
1.1.3 Instal mongodb and import at least 3 ip within the list.
Run the command:

The parameters behind are the nodes list needing setting up mongodb
1.1.4 Create mongodb Replica Sets;
Run the command:

The parameters are the nodes needing creating the replica set. It is a must to import 3 nodes where mongodb has already been installed
1.1.5 Modify the mongodb parameters of the master node: service_access.conf;
1.1.5.1 Copy the file: sevice_access.conf;

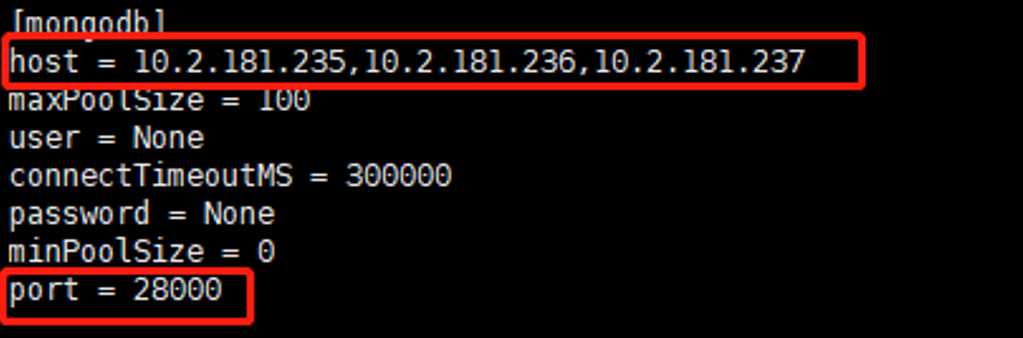
1.1.5.2 Modify the file service_access.conf which was copied to the root directory. Insert the three node-ip where mongodb is installed in [host];
1.1.5.3 Run;

1.2 Instal the Metadata Service;
Note: Below are example names of the packages, only for reference.
Package of the Metadata Service:This email address is being protected from spambots. You need JavaScript enabled to view it.
1.2.1 Download the package of the Metadata Service and store it in any directories of primary nodes;
1.2.2 Enter the directory of the master node, /sysvol/apphome/app/ThriftAPI/gen-py-tmp/Deploy;
Note: The following commands are executed in this directory.

1.2.3 Upload the Package;
Note: In uploading the installation package, the name of the service can be given freely. For example, emetadata.

Eg:
1.2.4 Instal the Metadata Service;
Note: Microservices are installed on multiple nodes and nodes IP need be separated by commas.

Eg:

1.2.5 Run the Command;

Note: What depServices.mongodb.host is imported are the three-node ip where mongodb is installed
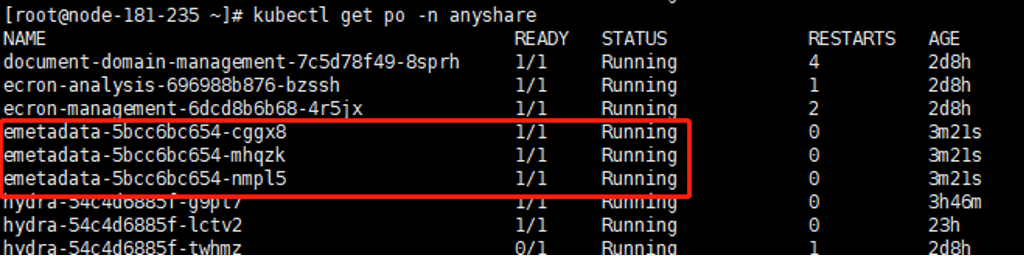
1.2.6 Deployment Verification
Run the command: kubectl get pod -o wide -n anyshare
If the pod status is running, it means a normal running status and a successful deployment
1.2.7 Uninstall the Metadata Service.

Eg:

Note 1) It should be consistent that the memories of all installation nodes of the Content Analysis and Retrieval Service.
2) Mount the disk to the directory: / anyshare / Aladdin-es-hot (the disk is used to store index data and the disk space is not less than the data size);
3) Modify the configuration file: / etc / fstab to realize the automatic mount after startup;
4) Below are example names of the packages, which is only for reference.
Package of Content Analysis and Retrieval: Analysis_Index-Server-7.0.0-20200629-el7.x86_64-33.tar.gz
1.1 Download the package of the Content Analysis and Retrieval and store it in any directory of primary nodes;
1.2 Enter the directory of the master node: /sysvol/apphome/app/ThriftAPI/gen-py-tmp/Deploy;
Note: The following commands are executed in this directory.
1.3 Upload the Package;
Note: In uploading the installation package, the service must be renamed “content analysis retrieval”.
Eg:
1.4 Instal the Content Analysis and Retrieval Service;
Note: Microservices are installed on multiple nodes and nodes IP need be separated by commas.
Eg:
1.5 Run the command: python /sysvol/apphome/service_init/set_es_mapping.py 127.0.0.1 9300;
1.6 Deployment Verification
Run the command: kubectl get pod -o wide -n anyshare
If the pod status is running, it means a normal running status and a successful deployment
1.7 In installing the Content Analysis and Retrieval, the Metadata service is not connected by default. If you need Metadata service-related functions such as tags, summaries, catalog search, etc., run the command
when the installation is finished.
1.8 Uninstall the Content Analysis and Retrieval Service;
II Antivirus Service
Note: Below are example names of the packages only for reference.
Package of the Antivirus Service:
1.1 Download the package of the Antivirus Service and store it in any directory of primary nodes;
1.2 Enter the directory of the master node: /sysvol/apphome/app/ThriftAPI/gen-py-tmp/Deploy;
Note: The following commands are executed in this directory.
1.3 Upload the Package;
Note: In uploading the installation package, the name of the service can be given freely. For example, eantivirus.
Eg:
1.4. Instal the Antivirus Service;
Note: Microservices are installed on multiple nodes and nodes IP need be separated by commas.
Eg:
You need to manually upload the virus database to the specified directory: /sysvol/cache/antivirus/rising/ of the Antivirus Service. By default, there is no such directory, rising, which needs creating manually.
The download address of the virus database is: AnyShare://产品安装包和补丁库/AnyShare产品部/瑞星病毒库
Now run the command: kubectl get pod -o wide -n anyshare. If an abnormal pod status is found,
run the command: kubectl get pod pod_name -n anyshare to restart the Containerized Antivirus Service (the pod_name here is only for reference)
1.6 Deployment Verification
Run the command: kubectl get pod -o wide -n anyshare
If the pod status is running, it means a normal running status and a successful deployment
1.7. Uninstall the Antivirus Service
Eg:
III Metadata Service
1.1 Instal Mongodb;
1.1.1 Upload the four mongodb installation packages (rpm packages) to each directory: /tmp/mongodb where the mongodb node needs installing;
1.1.2 Enter the directory of the master node, /sysvol/apphome/app/ThriftAPI/gen-py-tmp/Deploy (The following commands are executed in this directory.);
1.1.3 Instal mongodb and import at least 3 ip within the list.
Run the command:
The parameters behind are the nodes list needing setting up mongodb
1.1.4 Create mongodb Replica Sets;
Run the command:
The parameters are the nodes needing creating the replica set. It is a must to import 3 nodes where mongodb has already been installed
1.1.5 Modify the mongodb parameters of the master node: service_access.conf;
1.1.5.1 Copy the file: sevice_access.conf;
1.1.5.2 Modify the file service_access.conf which was copied to the root directory. Insert the three node-ip where mongodb is installed in [host];
1.1.5.3 Run;
1.2 Instal the Metadata Service;
Note: Below are example names of the packages, only for reference.
Package of the Metadata Service:
1.2.1 Download the package of the Metadata Service and store it in any directories of primary nodes;
1.2.2 Enter the directory of the master node, /sysvol/apphome/app/ThriftAPI/gen-py-tmp/Deploy;
Note: The following commands are executed in this directory.
1.2.3 Upload the Package;
Note: In uploading the installation package, the name of the service can be given freely. For example, emetadata.
Eg:
1.2.4 Instal the Metadata Service;
Note: Microservices are installed on multiple nodes and nodes IP need be separated by commas.
Eg:
1.2.5 Run the Command;
Note: What depServices.mongodb.host is imported are the three-node ip where mongodb is installed
1.2.6 Deployment Verification
Run the command: kubectl get pod -o wide -n anyshare
If the pod status is running, it means a normal running status and a successful deployment
1.2.7 Uninstall the Metadata Service.
Eg:
< Previous:
Next: >