Document Security Policy
Security Administrators/Super Administrators can define document security policies for each document library to enforce granular access controls and operational restrictions.
Note: The operation-based approval workflows for documents requires the AnyShare Workflow service to be installed and activated.
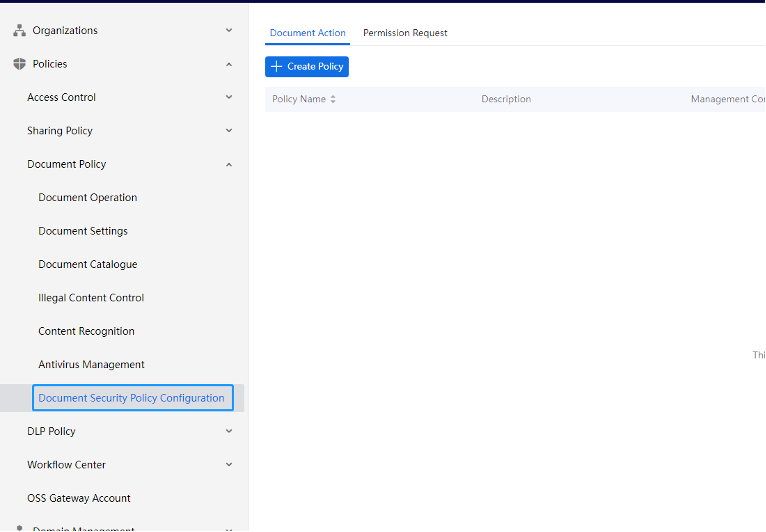
› Create Document Action Policy
Click [+Create Policy], administrators can configure control conditions and execution rules based on actual situations. The main steps are as follows:
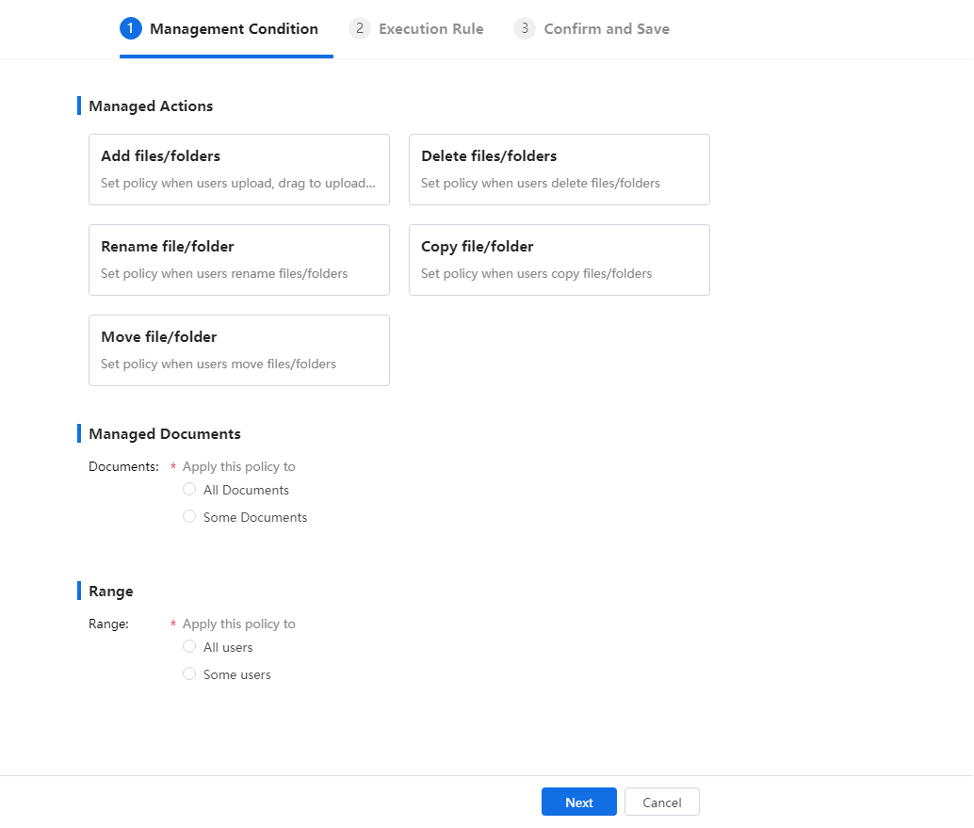
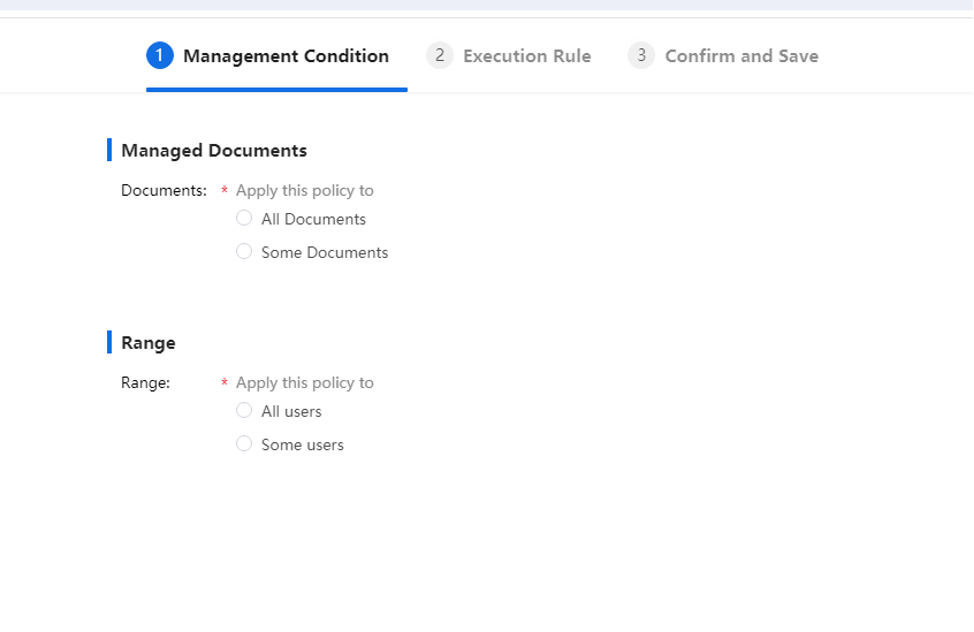
1. Configure the management condition
Select the controlled actions, which currently includes the add, delete, rename, copy, move actions. It is possible to set the scope of control and the users to whom control policies are applicable. Configure triggering methods and approvals and add different branches according to specific business scenarios.
Figure-Set for the conditions
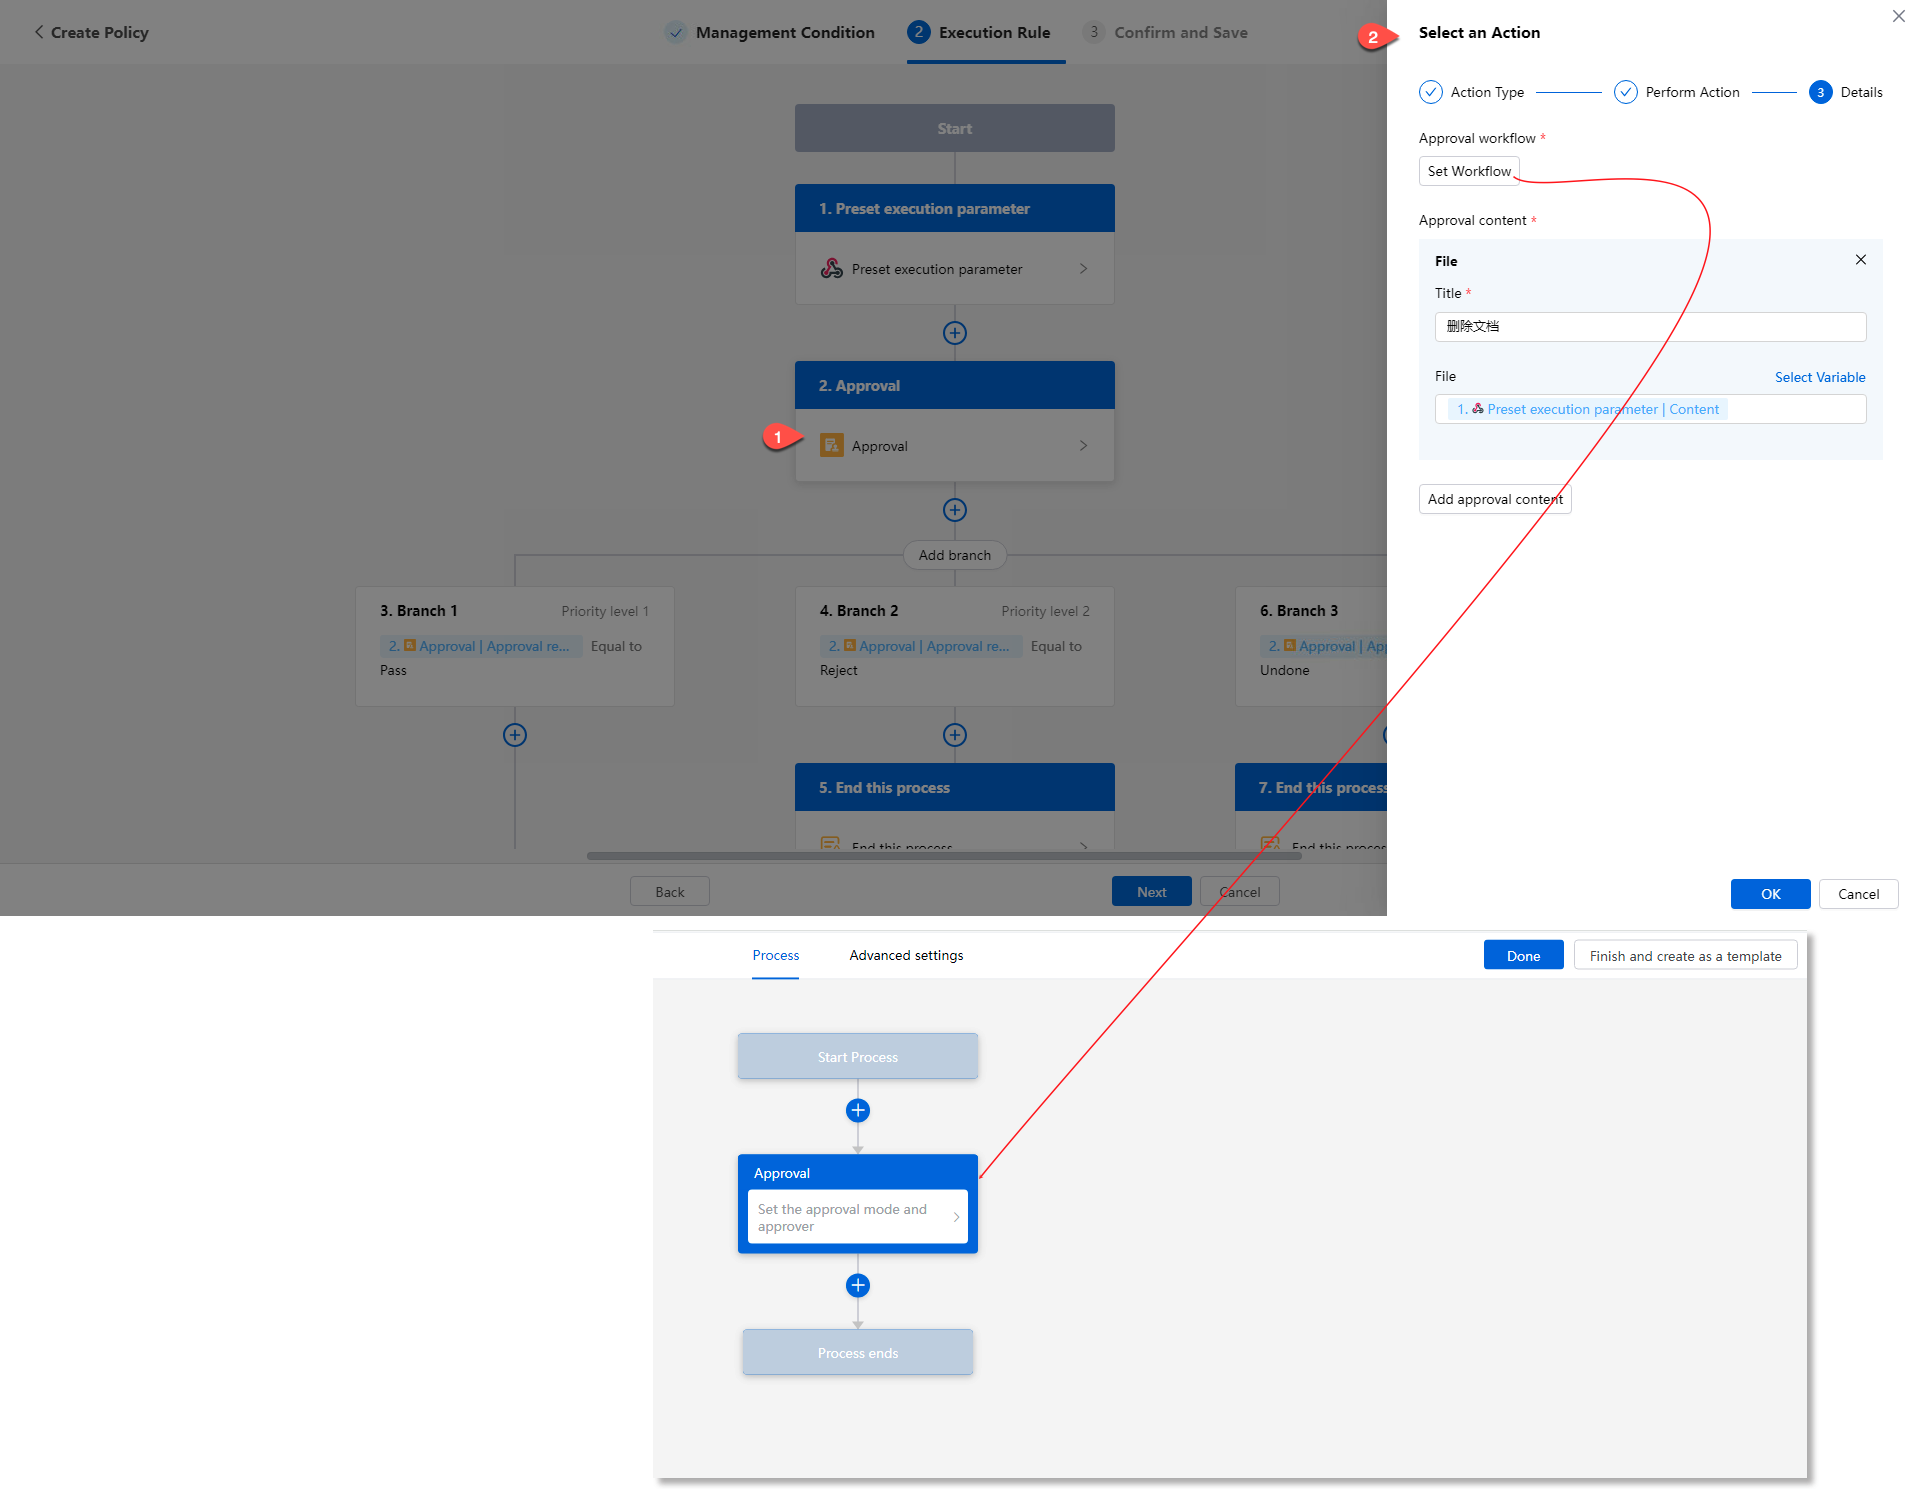
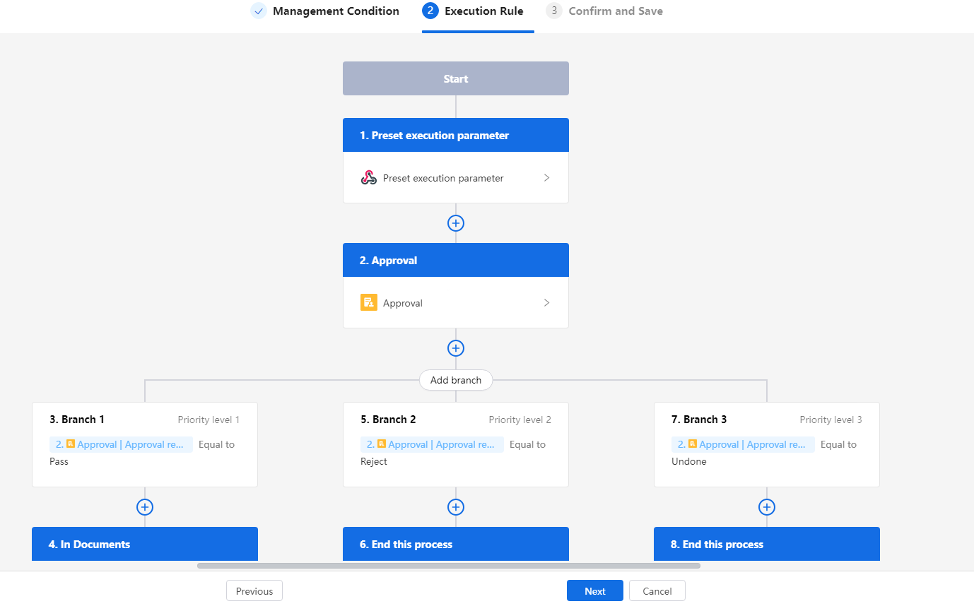
2. Configure the Execution Rules
On the Execution Rule page, Admin can set preset execution parameters and approval processes. Among them, custom preset execution parameters are not mandatory. If not configured, this process will be initiated and directly forwarded to review.
Figure-Execution Rules
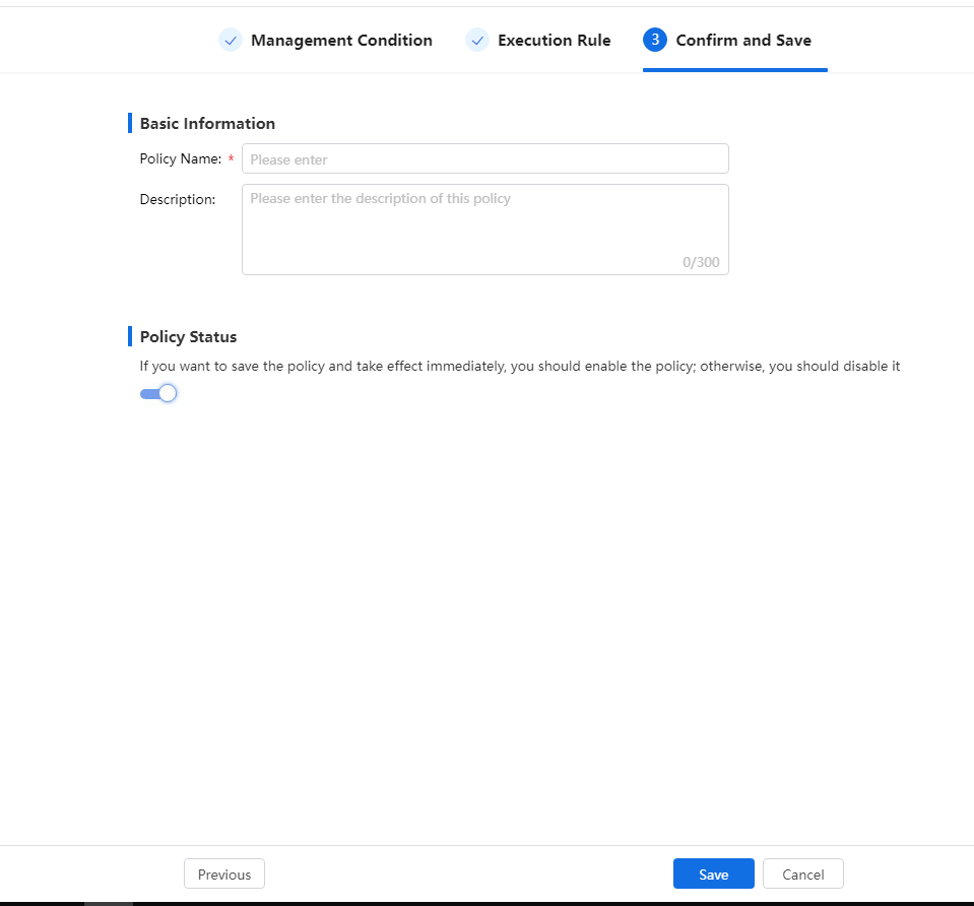
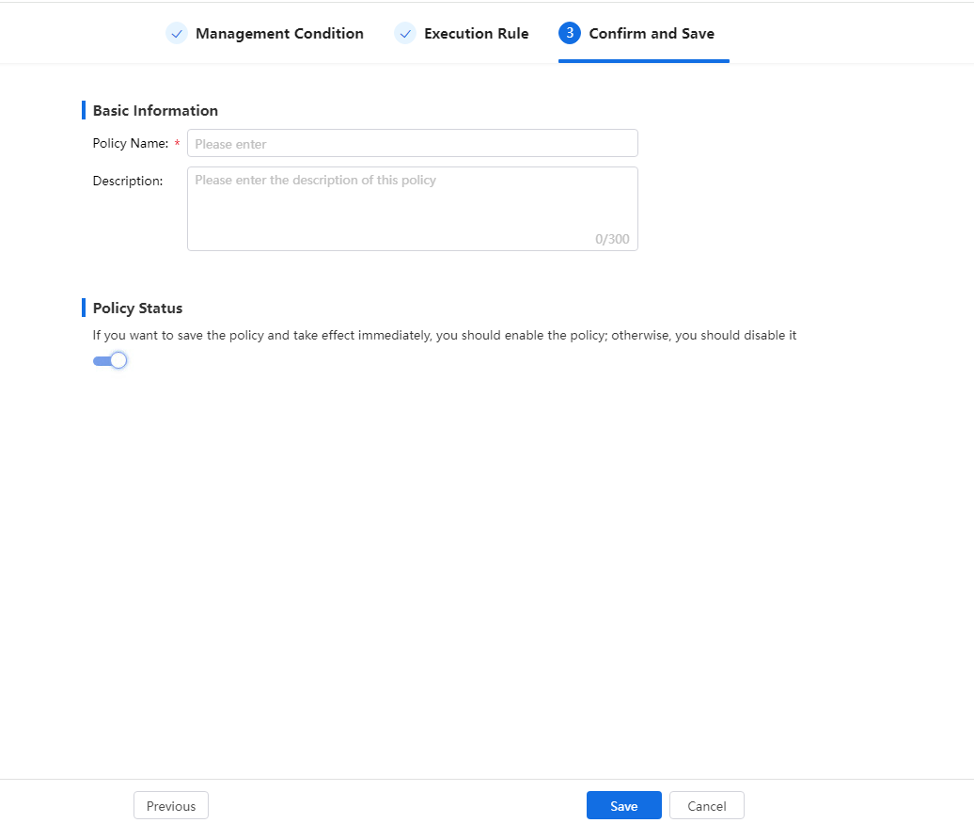
3. Confirm and Save
Enter the policy name and description, select whether to enable the policy, and click [Save] to complete the current process configuration.
Figure-Confirm and Save
› Create Permission Request Policy
Administrators can configure permission request policies, and once established, users can initiate permission requests for documents within the policy scope when obtaining the desired permissions.
Note: Access request policies for KnowledgebBase are configurable by Knowledge Administrators, enabling user apply for preview/edit permissions to this KnowledgebBase.
1. Configure the management condition
Administrators clicks on [+Create Policy] to enter the control condition setting page, set the Documents and applicable user scope controlled by the current policy.
Figure-Control condition settings
2. Configure the Execution Rules
Admin can click on the preset execution parameter stage to enter the selection trigger page.
In the current page, Admin can set the triggering conditions for permission request, mainly including permissions, dates, adding catalogue, tagging, and other content.

3. Confirm and Save
Enter the policy name and description, select whether to enable the policy, and click [Save] to complete the current process configuration.
Content Recognition Policy
Security administrators/super administrators can centrally manage sensitive word detection for the KnowledgeCenter through [Policies] > [Document Policy] > [Content Recognition].
Then, enable both "Illegal Content Control" and "Upload File Scan" functions, then upload a sensitive word following format specifications.
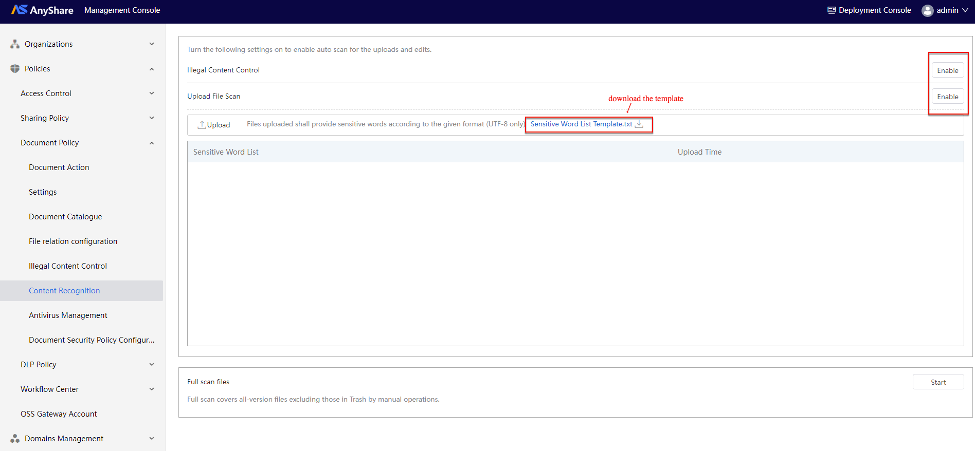
Once activated, AnyShare will automatically monitor and alert users about sensitive terms during knowledge creation, Q&A responses, and interactive comments in real-time.
User Login Security Policy
Both Security Admin and Super Admin can set the user ord validity, strength, reset method, etc.
Enter the [Policies] > [Access Control] page, and you can find [Login Policy] on the [Login] page.
Note: [Login Policy] is subdivided into "Password Policy" and "Login Policy".
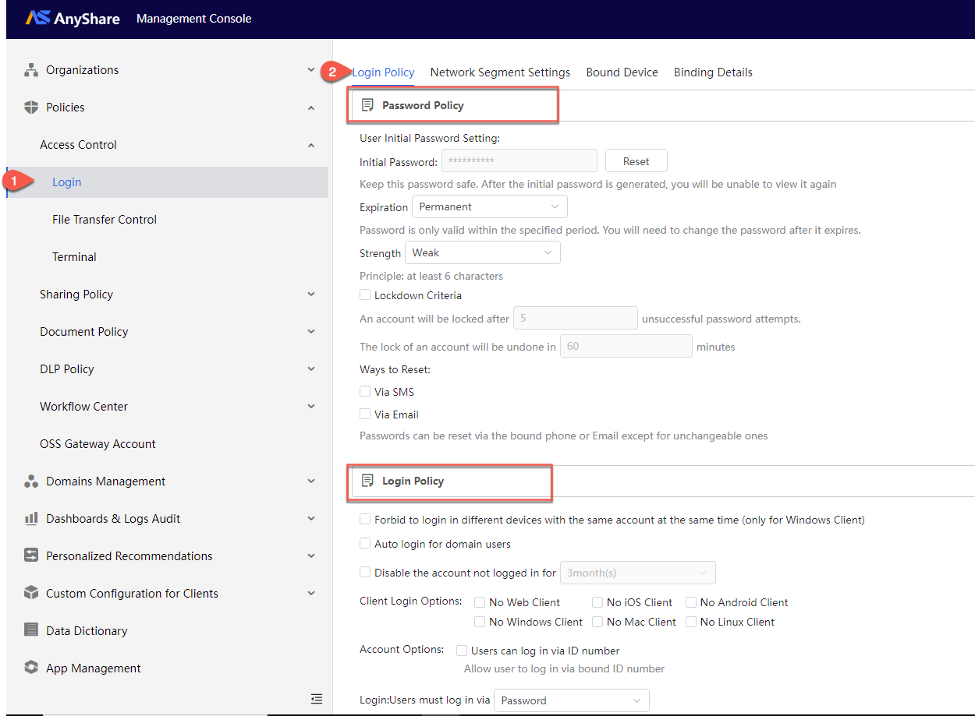
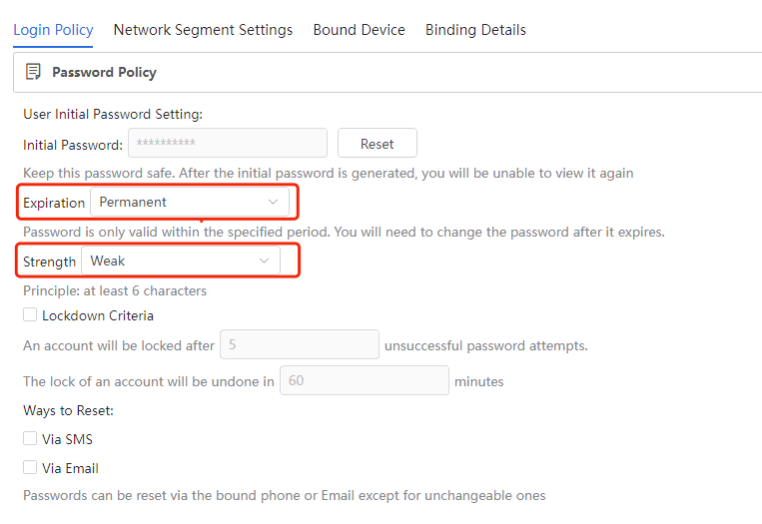
› Password Policy
Applies to both administrator and standard user accounts. Administrators can set the password expiration period and change the password strength to configure the desired password policy.
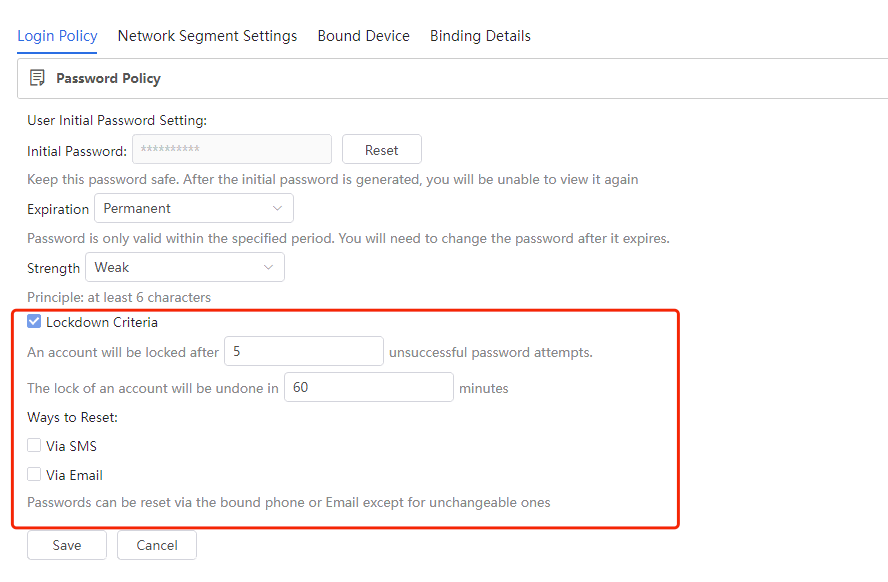
When the administrator enables [Lockdown Criteria], user accounts will be temporarily locked after exceeding the permitted number of consecutive incorrect password attempts. Administrators can configure:
-
- Maximum allowed failed attempts
- Account lockout duration
- Password reset methods (via bound mobile/email)
Note: After Admin sets the user password reset method, the corresponding server needs to be configured.
Note:
1)Locked user accounts require intervention from Security Admin or Super Admin for unlocking.
2)Locked administrator accounts require assistance from AnyShare technical support.
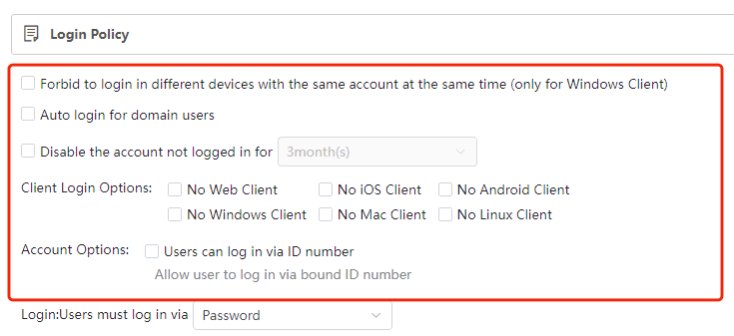
› Login Policy
To enhance account and data security in AnyShare, administrators can configure:
Login Conditions:
-
- Automatic disablement of inactive accounts
- Client-specific login restrictions
- Optional ID number authentication (requires administrator pre-configuration in the user information)
Dual-factor Authentication Methods:
-
- Default: Account + Password
- Enhanced options:
- Account Password + CAPTCHA
- Account Password + SMS Verification
- Account Password + Dynamic Token
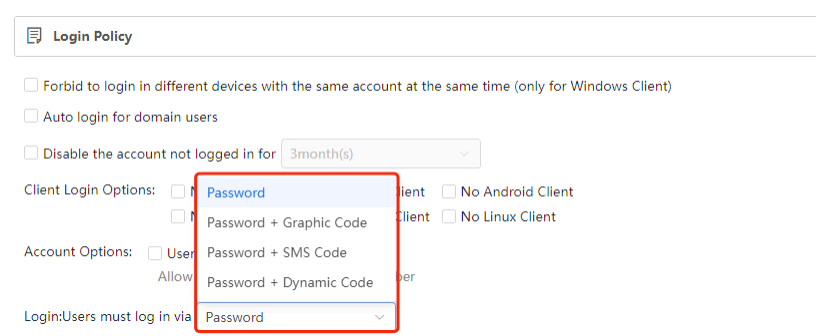
Dual-factor authentication provides an additional security layer by requiring secondary verification, significantly improving protection against unauthorized access to user accounts and enterprise data.
Note: SMS/Dynamic Token authentication requires third-party plugin configuration by administrators.
› Network Segment Settings
To prevent data breaches through remote access, administrators can restrict client logins to specific IP ranges. After binding, only the designated visitor can log in to the client in the designated IP segment.
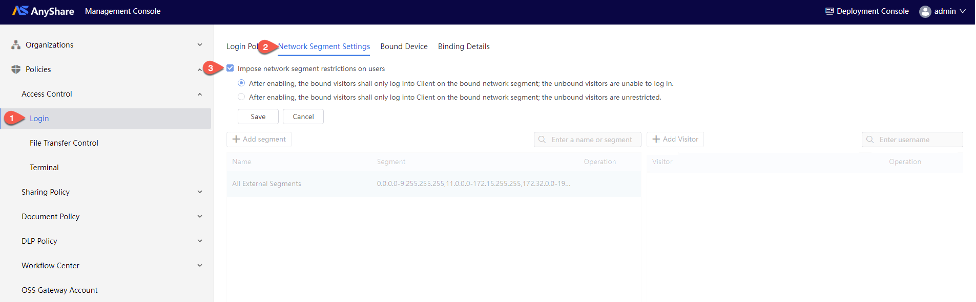
Configuration Steps:
1. Navigate to [Policies] > [Access Control] > [Login] > [Network Segment Settings], then check “Impose network segment restrictions on users” first.
2. Define permitted IP ranges
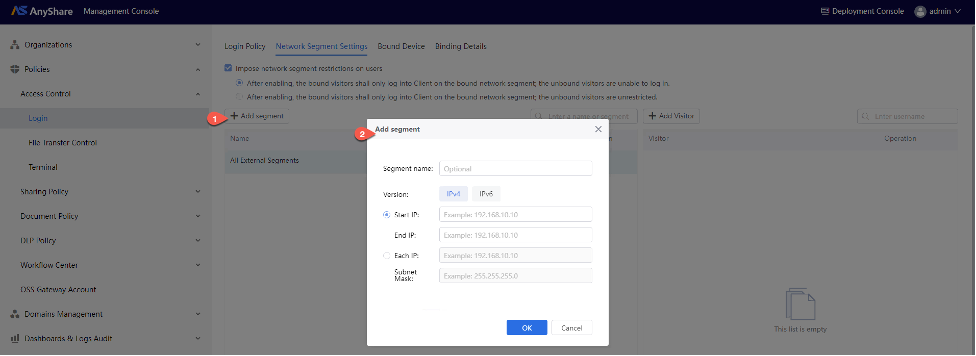
Click [Add Segment] and enter the corresponding information in the pop-up window to add a network segment. After adding a network segment, editing or deleting is supported.
Note: "Start and end IP" and "IP address and subnet mask" are different representations of network segments, so you can select one.
3. Bind authorized users/groups
Select the target network segment, click [+Add User] to add authorized users/departments and click [OK] to bind them.
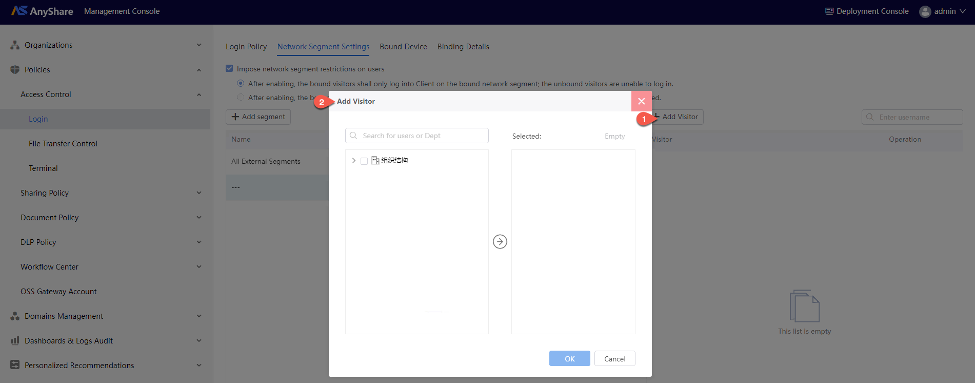
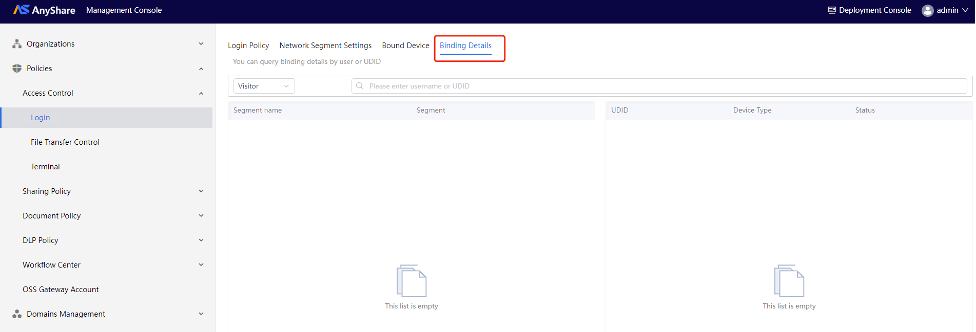
At the same time, Administrators can query the visitors and their bound network segments on the [Bind Details] page.
Client Sync Policy
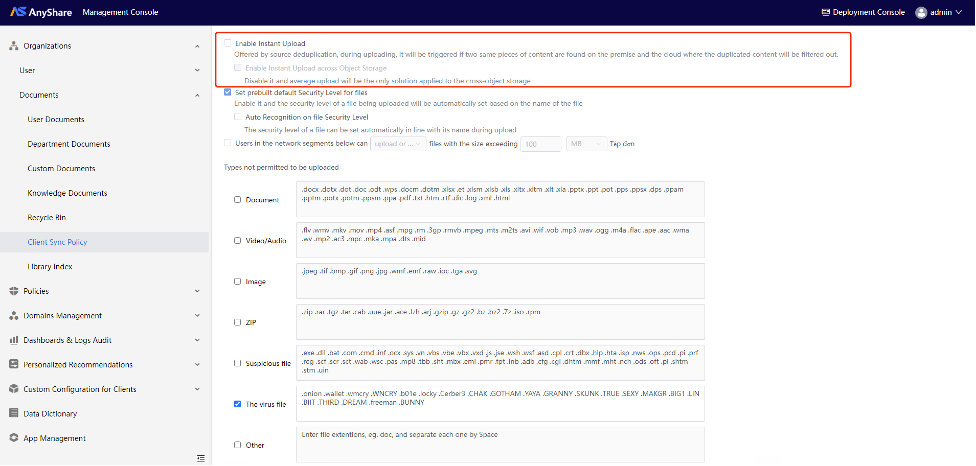
› Enable Instant Upload
Administrators can “Enable Instant Upload” to optimize file upload efficiency. When enabled, the system will skip uploading files that already exist on the server with identical content. By default, Instant Upload works across all Object Storage instances.
Note: When using multiple object storage systems, files successfully uploaded via Instant Upload may need to be downloaded from alternate storage locations during access.
Administrators can choose “Do not enable Instant Upload across Object Storage” based on specific requirements. This setting should be configured according to your deployment scenario.
Figure-Instant Upload
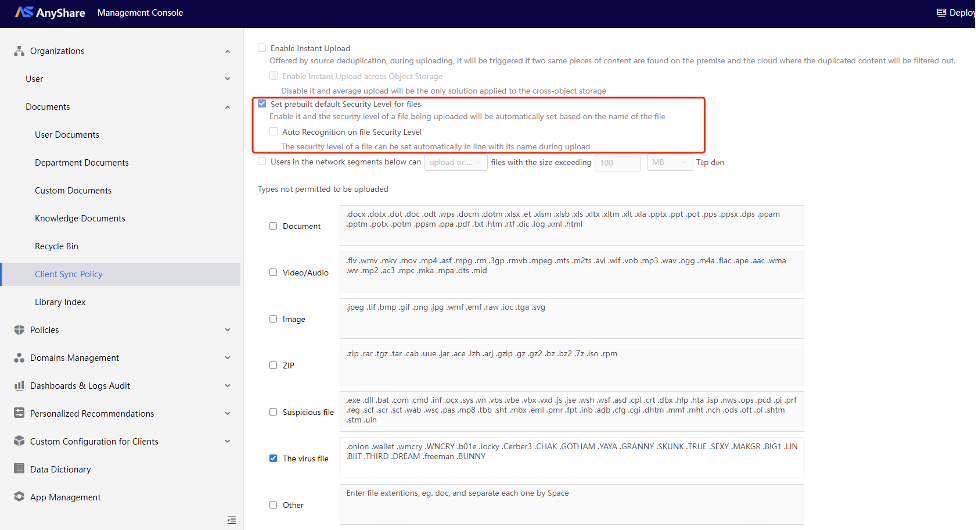
› Set Default File Security Level
When enabled, this policy requires users to set a security level before uploading any file. Administrators may optionally enable "Auto Recognition on the file Security Level" which automatically assigns security levels based on file names during upload.
Figure-Set prebuilt default Security Level for files
› Restrict File Size by Network Segment
Administrators can limit upload/download sizes for users accessing from specific network segments.
Check the restriction box and fill in the restricted file size, then click the [Add] button to specify target network segments, and enter the IP address and subnet mask, finally, click [Save].
Figure-Add network segment

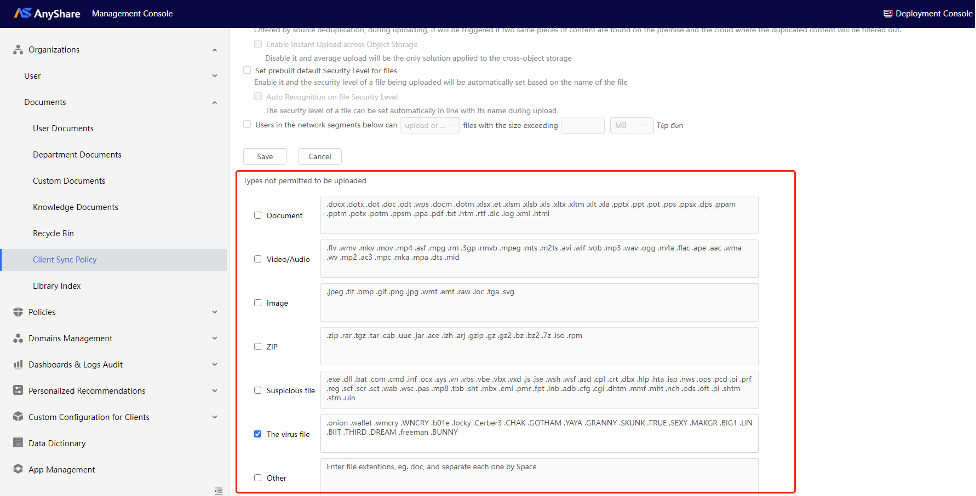
› File Type Upload Restrictions
Administrators may restrict uploads by file category, including documents, video/audio, pictures, compressed packages, suspicious files, and virus files.
Each category displays common file extensions, with an "Other" field for custom extensions. After selecting prohibited file types and saving the configuration, AnyShare will block uploads of matching files. Additional restricted file types can be manually added as needed.
Figure-Limit the Type of Uploaded Files
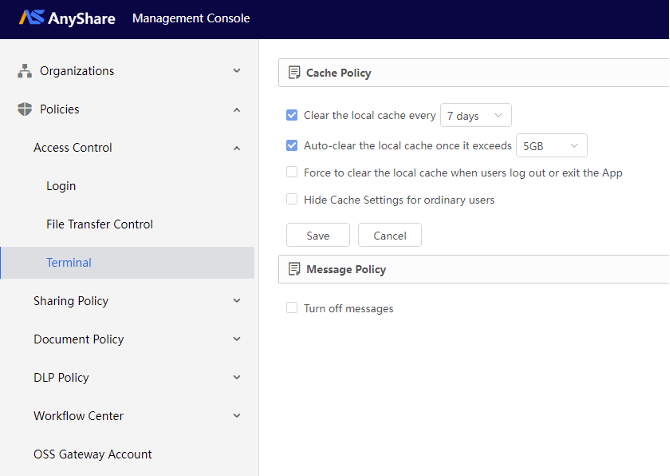
Cache Policy
Administrator can configure cache control policies through [Policies] > [Access Control] > [Terminal] in the Management Console. These policies enable scheduled or size-based automatic cleanup of the local caches to optimize disk space utilization.
Sharing Policy
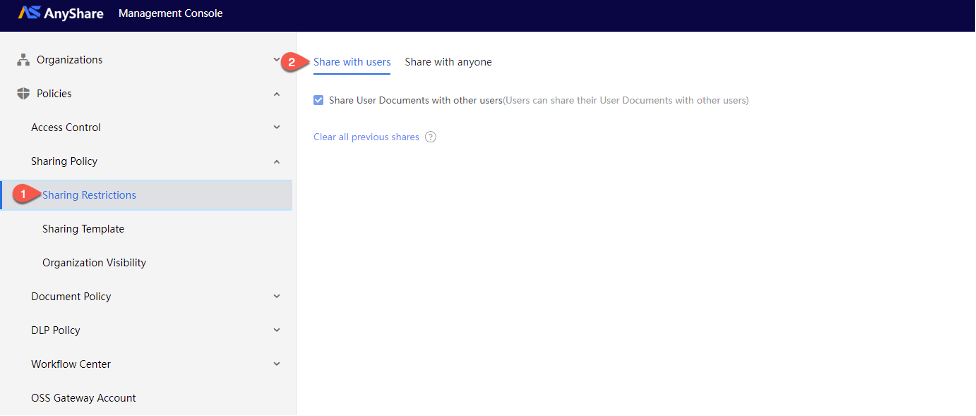
› Sharing Restrictions
Share User Documents with other users: if it is enabled, users can share User Documents with other users.
Figure-Share with users
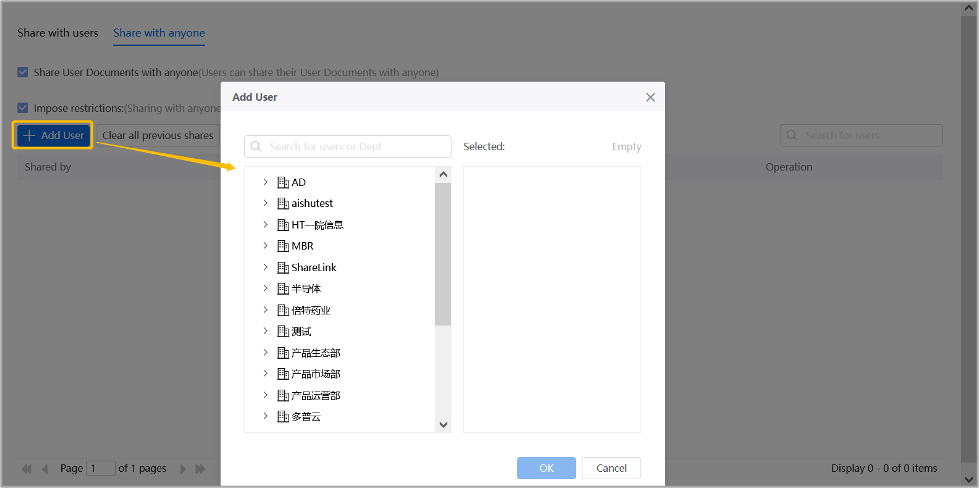
Share User Documents with anyone: if it is enabled, users can share their User Documents with anyone.
If the restrictions are enabled, administrator needs to add users, then sharing with anyone is available only for the users below.
› Sharing Template
Admin can set different sharing template policies for different users, control the configurable access permissions for users when sharing files, and effectively avoid the risk of file leakage caused by accidental operations such as forgetting to set passwords.
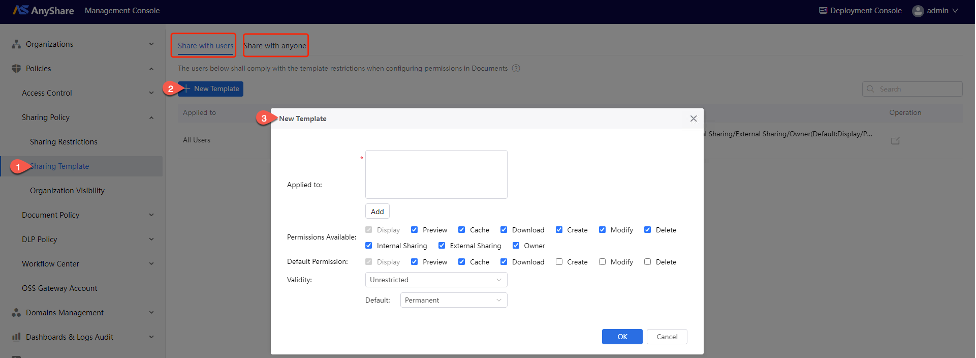
Administrators can configure document library access permissions and validity periods for specified users via [Policies] > [Sharing Policy] > [Sharing Templates] > [+Create Template].
Once configured, users within the template scope can share with other users (internally/externally) in the client, assigning policy-approved access permissions and validity periods to recipients - ensuring both data security and collaborative efficiency.
Note: Users with sharing permissions cannot share with themselves. When sharing, privileged users cannnot modify “Owner”, ”Internal Sharing”, ”External Sharing” permissions.
› Sharing Approval
Administrator can enable workflow for “Approval for sharing with users” and “Approval for sharing with anyone”, and set up the approval policy, the sharing will take effect only after the workflow is approved.
Figure-Workflow for Shares

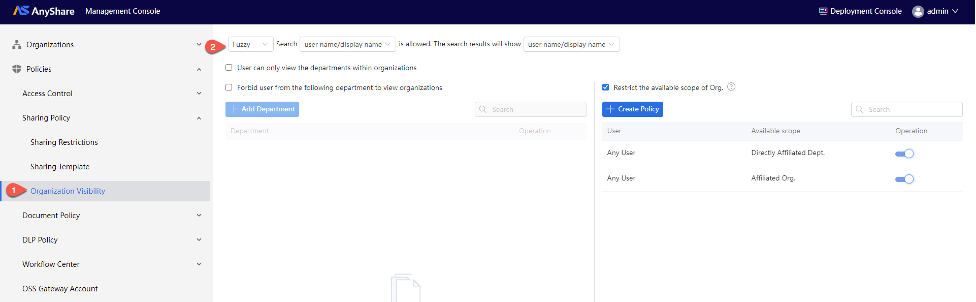
› Organization Visibility
This policy controls the visibility of user names and display names in search results during sharing activities. Administrators can configure these settings to restrict users to viewing only their departmental colleagues within the organization, with the additional capability to completely block access to organizational information for specified departments.
Figure-Organization Visibility
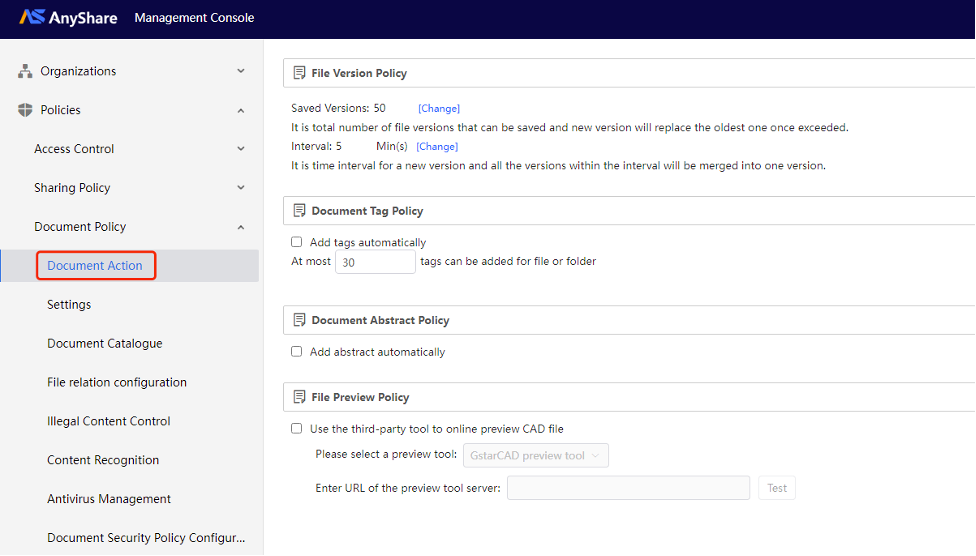
› File Version/Tag/Abstract/Preview Policy
Administrator enters the [Policies] > [Document Policy] > [Document Action] page to set the following policies.
Figure-Document Action Policies
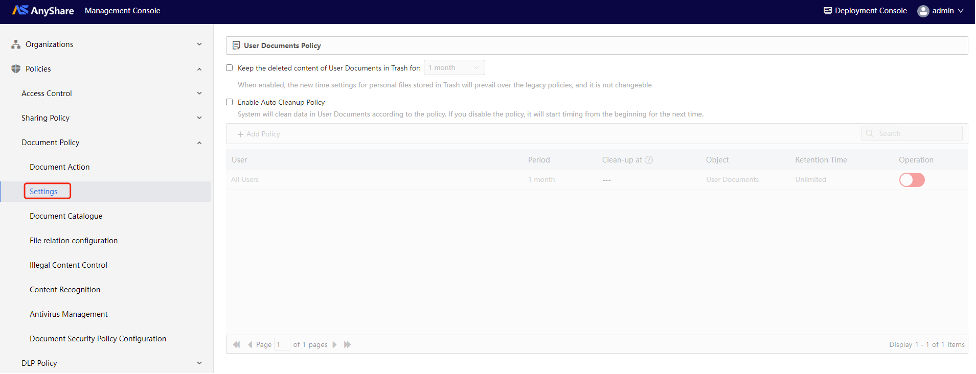
User Document Policy & Auto Cleanup Policy
Administrator can control how long the deleted content of User Document is retained in Trash. When enabled, the new time settings for personal files stored in Trash will prevail over the legacy policies, and it is not changeable.
When “Enable Auto Cleanup Policy” is chosen, AnyShare will clean data in User Documents according to the policy. If it is disabled, it will start timing from the beginning for the next time.
Figure-User Document Policy and Auto Cleanup Policy
Document Catalogue Policy
Document Catalogue enables the manual process of adding attributes to files through predefined templates in the Management Console, supporting full customization of template names and attribute configurations (add/modify/delete).
For some file formats whose contents cannot be automatically indexed, such as audio, video, images, electronic scanning copies, compressed packets, etc., you can manually input the attribute values for classification management and convenient search.
The following gives you an overview of how Administrator can set up the Document Catalogue Policy.
On the [Policies] > [Document Policy] > [Document Catalogue] page, Administrator can limit the maximum number of users to add catalogues for files/folders.
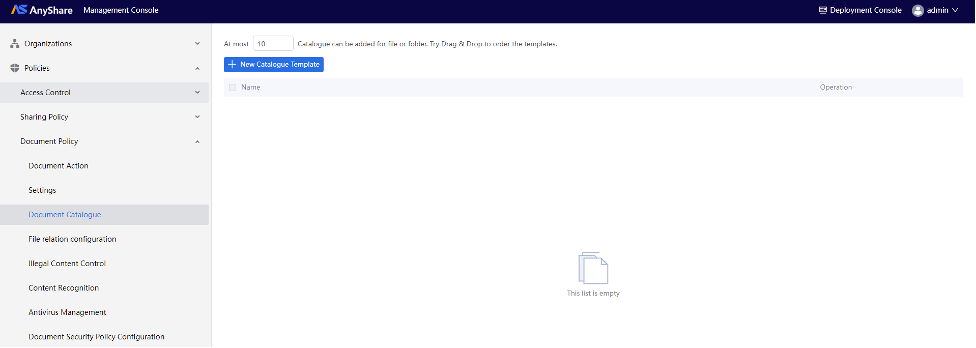
Click the [+New Catalogue Template] button to open the creation page where you can name the template, specify applicable departments, and define required attributes for files or folders using this template.
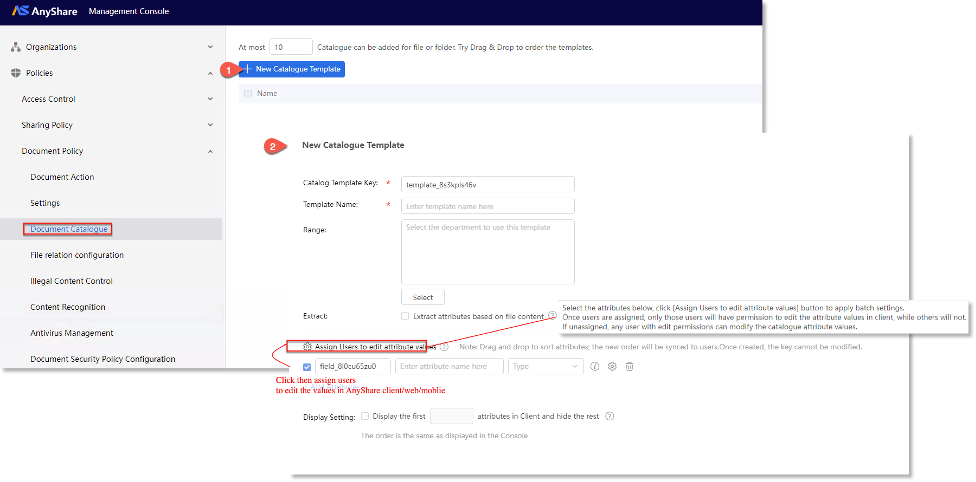
Administrators can enable specific users (AnyShare client/web/mobile) to modify designated attribute values by selecting the target attribute and clicking “Assign users edit attribute values”, thereby granting granular editing privileges without broader content access.
For instance, in enterprise document archival workflows, while document administrators are restricted from modifying content, they may update designated metadata attributes to reflect archival status, for which administrators can grant selective editing permissions to balance tracking needs with security.
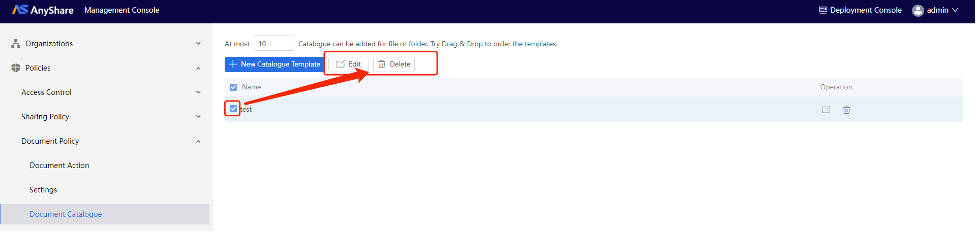
The created catalogue templates can be re-edited or deleted.
Figure-Edit or Delete the Catalogue Template
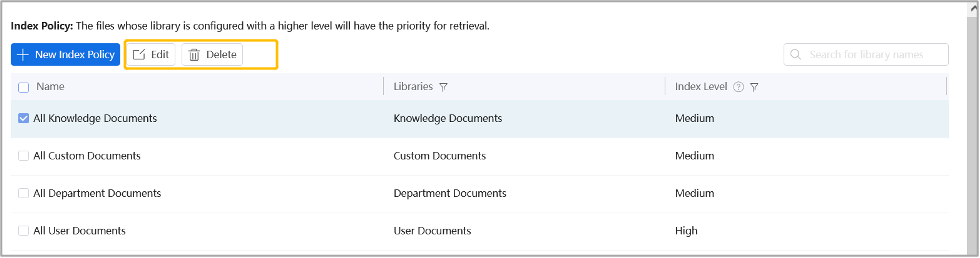
Index Policy
In daily office operations, efficient file search capabilities are crucial. Different documents often require varying search priorities, making it essential to prioritize indexing for frequently accessed files while deferring less important ones. Without proper Index Policy configuration, simultaneous file modifications or bulk uploads from multiple users may result in indexing based solely on modification timestamps, potentially delaying access to critical documents during searches.
To address this, AnyShare Family 7 introduces Index Policies that enable prioritized document retrieval. Files assigned higher priority levels will appear prominently in search results, significantly improving search efficiency.
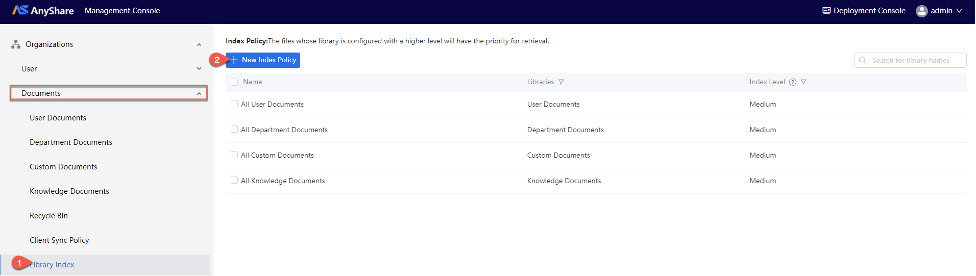
It supports the configuration of Index Policies for User Documents, Department Documents, Custom Documents, and Knowledge Documents, offering five customizable security levels (lower, low, medium, high, and higher) that administrators can assign based on their enterprise's specific operational requirements.
Figure-Create New Index Policy

Administrators retain full management capabilities to modify or delete existing Index Policies as needed.
Figure-Edit or Delete the Index Policy
File Transfer Policy
To prevent AnyShare's total network bandwidth from being overloaded and affecting other services, Administrator can control the network speed of users/departments and the maximum number of downloads for users.
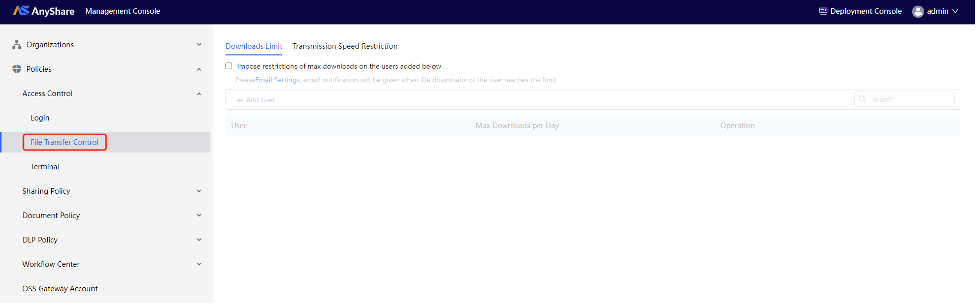
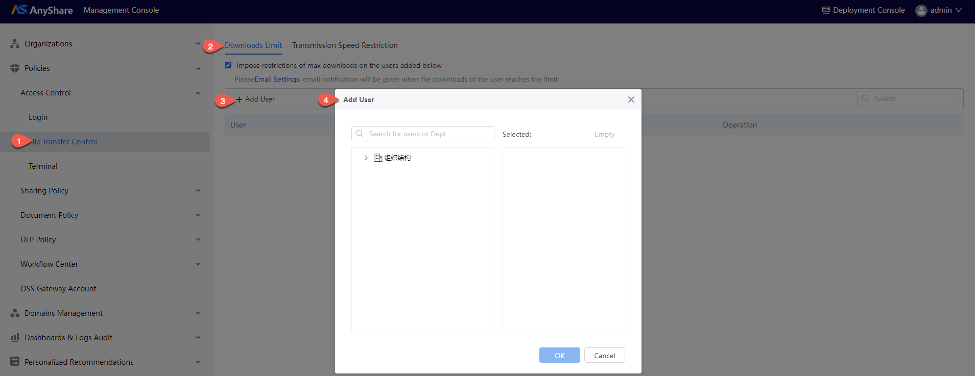
› Downloads Limit
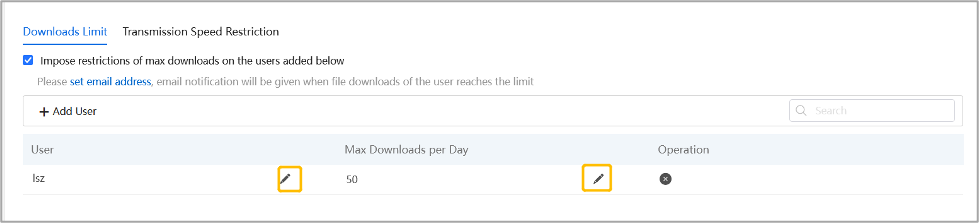
Click [+Add User] to limit the maximum number of files they can download per day, and users who have not been added are not limited.
Click the “![]() ” button to modify or add users and modify the max downloads per day.
” button to modify or add users and modify the max downloads per day.
› Transmission Speed Restriction
Here is to limit the upload/download speed of users and departments.
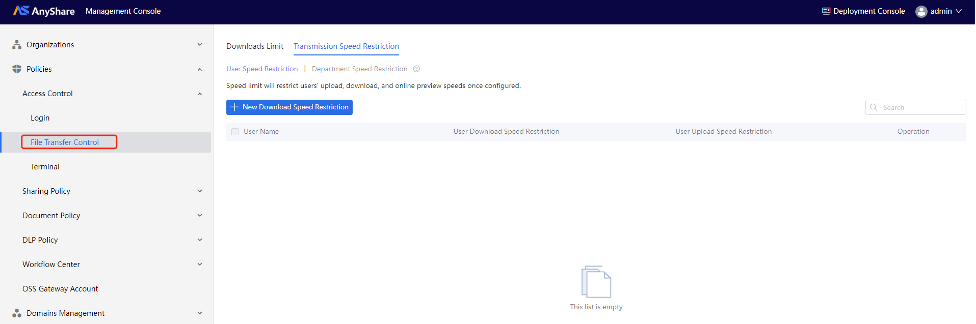
› User Speeds Restriction
On the User Speed Restriction page, click [+ New Downloads Speed Restriction] to configure maximum upload/download speeds for individual users.
Figure-User Speeds Restriction

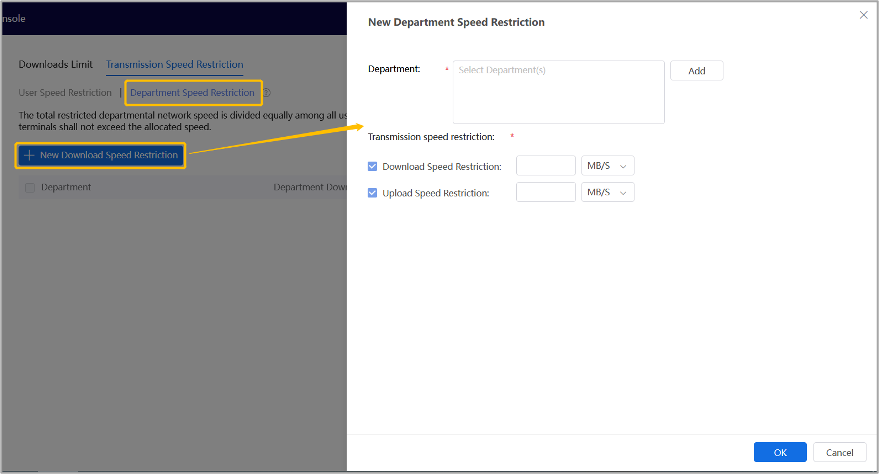
› Department Speed Restriction
On the Department Speed Restriction page, click [+ New Downloads Speed Restriction] to establish upload/download speed limits for entire departments.
The system automatically distributes the allocated departmental bandwidth equally among all active users within the department who are simultaneously transferring files. Each user's cumulative transfer speed across all connected devices will not exceed their assigned portion of the departmental quota.
Figure-Department Speed Restriction
DLP (Data Lock Prevention) Policies
How to avoid your documents being tampered with or stolen in collaboration? What should we do if there is a DLP of internal files? Under these circumstances, AnyShare has provided Watermark, with which you can prevent files from being opened, copied, printed, modified, and also can check the related audit records of all document flow.
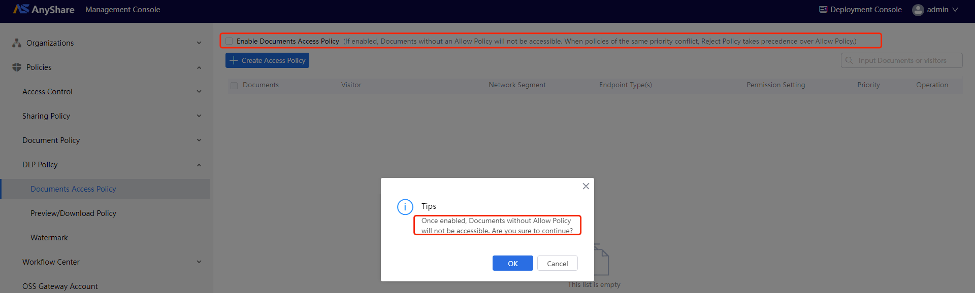
› Documents Access Policy
Document library access policies enforce secure content governance by controlling visitors, IP ranges, terminal types, priority, and operational permissions within specific documents.
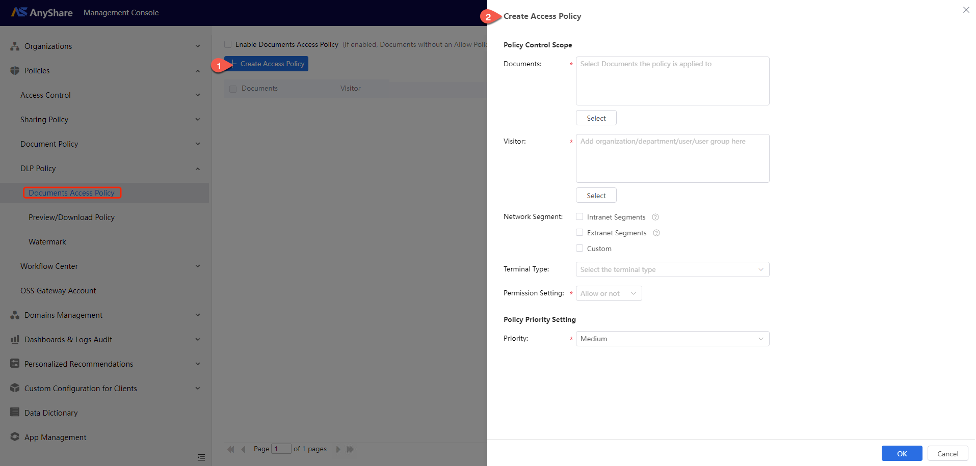
Note: When administrators “Enable Documents Access Policy” option, any documents without explicitly configured in the allowlist will become inaccessible.
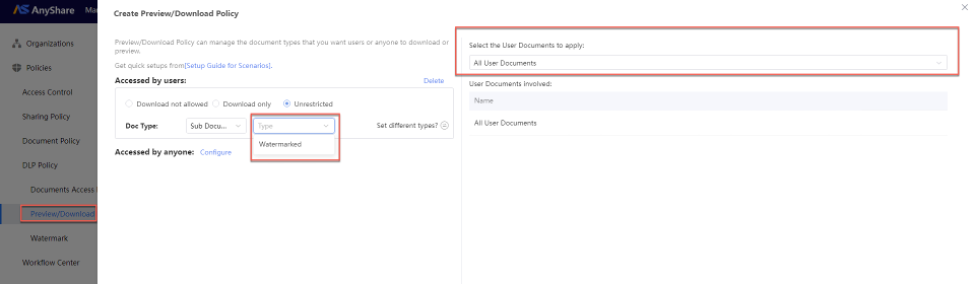
› Preview/Download Policy
To uniformly manage document types, Administrators can configure the Preview/Download Policy on the [Policies] > [DLP Policy] > [Preview/Download Policy] page of the Management Console.
Note: The watermark function is the built-in feature in AnyShare Main Module Service. Other functions such as encryption/decryption, egress package, etc. can only be used after purchasing corresponding service modules.
Before policy configuration, Administrators can create templates (watermark, egress package, encryption/decryption) then configure preview/download policies, which determine user permissions and document access types during viewing/downloading.
Note: Administrators can configure knowledgebase-specific preview/download policies to auto-apply watermarks.

To create preview/download policy
Enter the [Policies] > [DLP Policy] > [Preview/Download Policy] page to create a new policy.
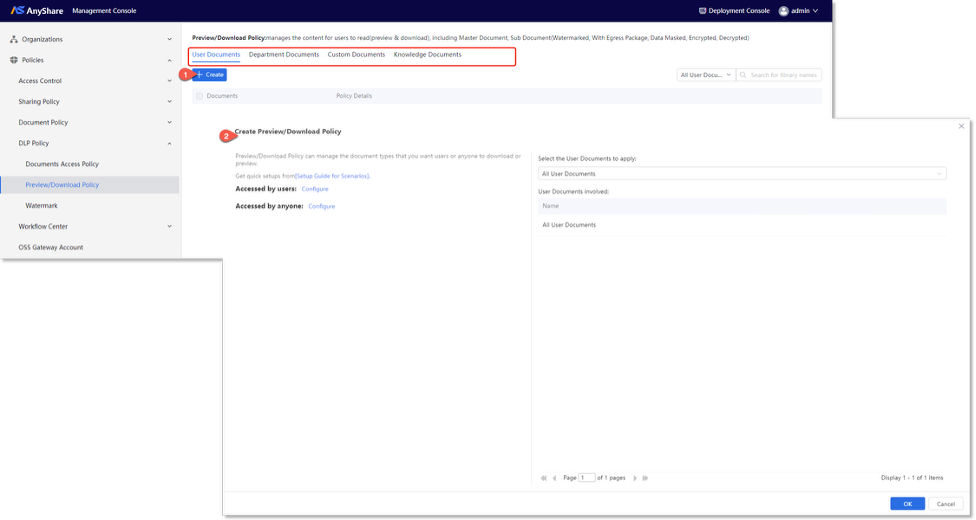
On the creation page, administrators establish select the document library type (e.g., User Documents, Department Documents, Custom Documents). Then set permissions for different access types according to the desired scenarios, and select the Documents for which you want to configure policies.
On the configuration page, administrators establish permission policies for different access scenarios by defining access types and selecting applicable documents and organizational members, thereby controlling designated or arbitrary users access master documents or sub documents when previewing/downloading shared files.

Configuration includes:
1) Document types – Master Document (original uploaded files) or Sub Document (converted derivatives).
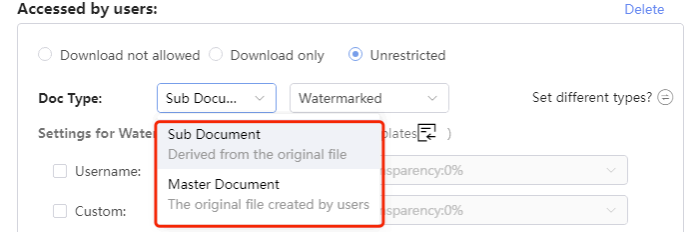
2) Access types - specified users or any user.
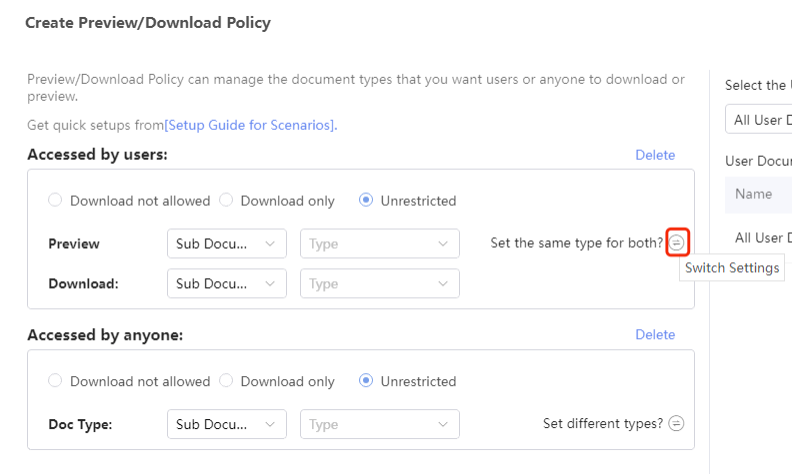
3) Access methods – Download not allowed, Download only, or Unrestricted (click the "" button to configure separate document access methods for both preview and download operations are permitted).
4) Policy Type – Watermarked. Select " Watermarked" under processing type options, then configure watermark settings below. Click [Preview] to visualize the watermark effect before finalizing.
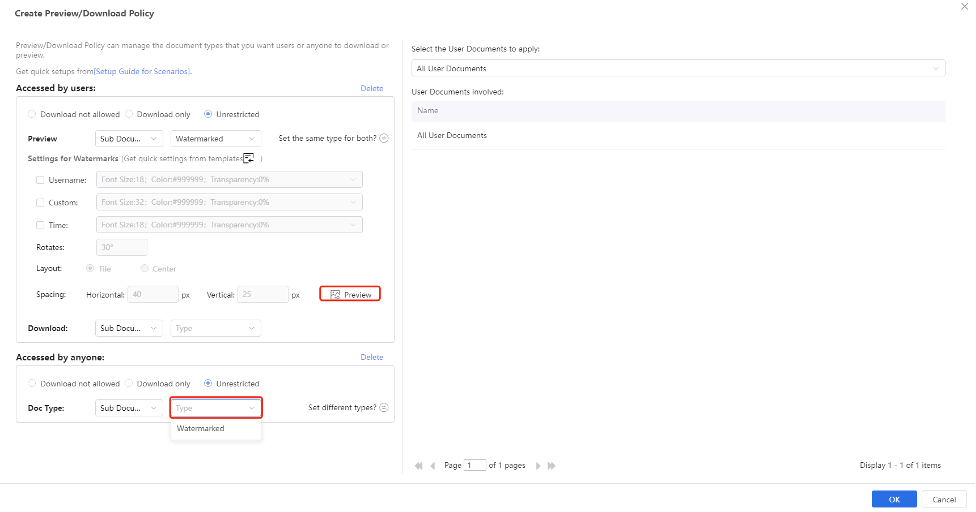
Note: The watermark function is the built-in feature in AnyShare Main Module Service. Other functions such as encryption/decryption, egress package, etc. can only be used after purchasing corresponding service modules.
› Encryption Policy
Security administrators can manage online document editing/saving policies through Encryption Policy page, applicable to all AnyShare online editing tools (Office Online, WPS Online). Once activated:
-
- Users can upload DLP-controlled encrypted/plaintext files via the AnyShare client.
- Authorized users retain online preview/edit capabilities, with post-editing encryption status automatically enforced according to the configured policy.
- Note:
- 1) The Encryption Policymodule requires installed Encryption Services, otherwise it will remain hidden and unavailable for configuration.
- 2) The security domain toggle is only functional when Huatuencryption services are deployed.
- 3)Configured encryption policies apply universally across all documentsand operate independently from other documents-specific read policies.
› Watermark Template
Security Admin or Super Admin can enter Policies > DLP Policy > Watermark Template, and add or view, edit, or delete templates.
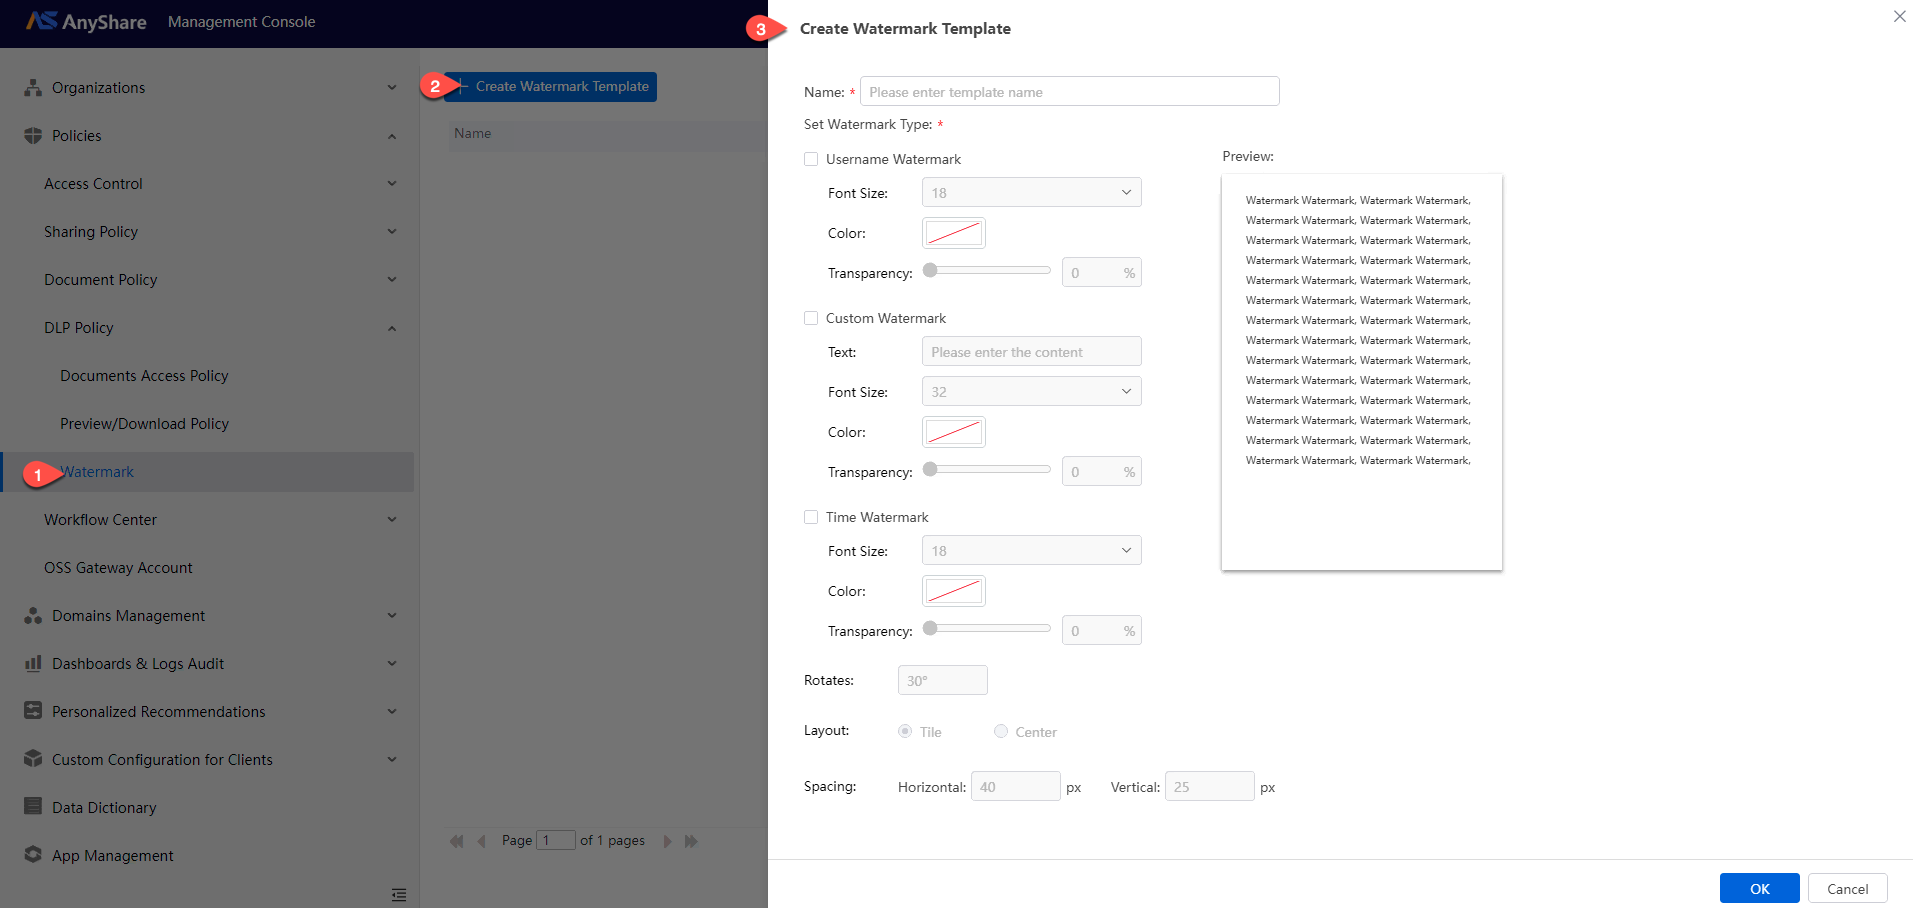
• New Template: In Watermark Template, click [+Create Watermark Template] in the upper left corner. Admin can select the types of watermarks according to the requirements and configure its font, color, opacity, and format.
• Edit Template: Click "![]() " on the Watermark Template page, and you can change its type and related format.
" on the Watermark Template page, and you can change its type and related format.
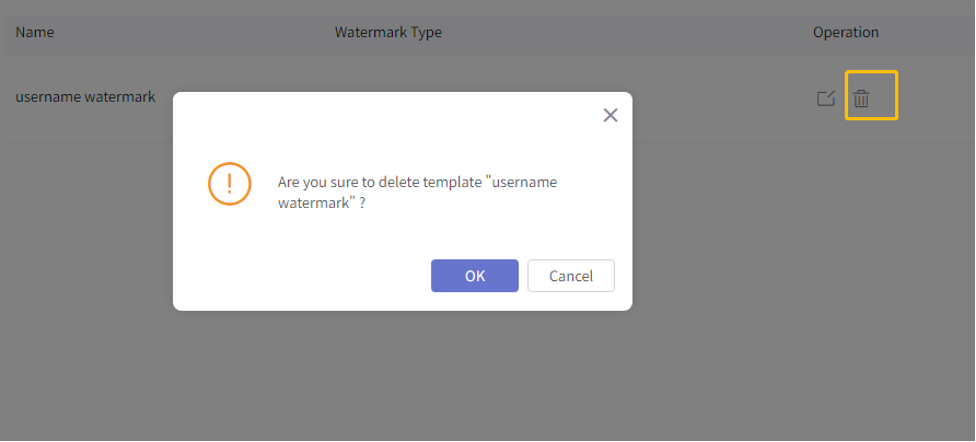
• Delete Template: Click "![]() " on the Watermark Template page and you can delete the existing templates. The templates that are already used in Document Library cannot be deleted directly. Admin needs to go to the Watermark Template page to unbind it first before delete.
" on the Watermark Template page and you can delete the existing templates. The templates that are already used in Document Library cannot be deleted directly. Admin needs to go to the Watermark Template page to unbind it first before delete.
• Search for Templates: On the Watermark Template page, Admin can enter the template name in the upper right box to search.
Subsequently, you may apply the pre-configured watermark templates to desired Documents (User/Department/Custom/Knowledge Documents) through the Preview/Download Policy settings.